Saturday 12 December 2015

Farmer’s Wife 1930s Quilt Blocks 23, 24, 25, 26 and 55

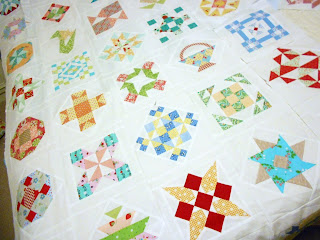
Farmer's Wife Star

We move out of the ‘C’s for the Very Kerry Berry sew-along this past fortnight but only just:

Block 23 – Charlotte.  I made this block initially when I thought I would sash my blocks on point as shown in the book.  Doing it that way requires half-triangles for some of the ends.  However, since then I have joined the units and added it as a ‘straight set’ block.  Notes read:  “Easy paper-piecing” and it was. 
Farmer's Wife 1930s block no. 23 - Charlotte

Block 24 – Coral.  I patched this block for the Gnome Angle sew-along in week 3.  “An ‘odd’ looking block.”  I will not be adding it to the finished quilt but have replaced it with the ‘full’ star block shown at the top of this blog post. 
Farmer's Wife 1930s block no. 24 - Coral

Block 25 – Crystal.  My notes in the book say it all .....“3 hours – shocking block and to finish you have all those seams in the middle.  Yuk, yuk and yuk.”  
Farmer's Wife 1930s block no. 25 - Crystal

Block 26 – Daffodil.  I didn’t like this block initially and a lot of people on the Facebook group also didn’t like it.  But I paper-pieced it in Bonnie and Camille and it turned out so pretty.  I have sashed it in on-point. 
Farmer's Wife 1930s block no. 25 - Daffodil

For the Gnome Angel sew-along there were just two blocks this week:

Block 22 – Cat.  This block was covered last week for the Very Kerry Berry sew-along.  But to recap the notes in my book read “nice to paper-piece”. 
Farmer's Wife 1930s block no. 22 - Cat

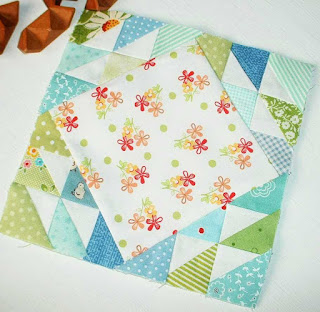
Block 55 – Malvina.  I had put off making this block because, to be honest, I was fed up of patching half-square triangles.  However, it cropped up this week on the Gnome Angel sew-along so there was no escape.  But instead of patching I paper-pieced it and it went together quickly (30 minutes) and relatively easily. 
https://uk.pinterest.com/pin/568860996662151689/
Farmer's Wife 1930s block no. 55 - Malvina

Remember you can see all the blocks on my Farmer's Wife 1930s Pinterest Board or by clicking on the 'Farmer's Wife 1930s' tab above.

Next week both of the Very Kerry Berry blocks have lots and lots of pieces so I better go and make a start on them ...............

Thursday 3 December 2015

Christmas Table Topper


Of all my patterns I think the Patchsmith’s Alphabet is one of the most versatile.  This pattern is only $1.99 yet it contains three full sets of alphabet letters (one upper-case, one lower-case and a smaller mug-rug alphabet).  
Create a personalized mug rug gift
It is great for adding initials to the back of a quilt, making a personalized mug rug or adding a name to a school plimsoll bag.  

It is also perfect for making a topper for the Christmas table - a place where you can rest the sauces, pickles and condiments.  

And here is how I did it .....

You will need:
One 18” x 6” rectangle for the background
One 16” x 5” rectangle of tartan fabric for the word
One 16” x 5” rectangle of fusible webbing
One 18” x 6” rectangle of batting
1½yds of binding (I used 1¼” single fold binding) 
Ribbon/rick-rack/trim (optional)

If you are making this as a hostess gift you might want to make the batting heat-resistant (i.e. Insulbrite etc).
I only had a remnant of tartan
so I created my applique in two sections.

1.  Start by drawing a straight line onto the paper side of the fusible webbing so that it is ½” up from the bottom edge.   Next trace your preferred word onto that line starting at the right-hand edge and working towards the left.  I used the upper-case and lower-case letters.  The templates are already reversed making it quick and easy to copy and trace.  
Overlap your traced letters with each other very slightly and overlap them on the traced line. 

Overlap the letters slightly so that they join together and set the bottom of each letter very slightly below the straight line to create a crisp straight bottom to the word ‘Christmas’ (you will cut along the straight line to create the word).

Connect the dot above the 'i' to form one continuous letter. 
Join the dot above the 'i' to the letter.

2.    Once your word is traced onto the fusible webbing, cut around it roughly leaving ¼” between the edge and the tracing.  Follow the manufacturer’s instructions and fuse to the WRONG side of the tartan fabric.  (I use Bondaweb so all I need do is iron it with a fairly hot iron and a little bit of steam – it works a treat.)
See how my letters overlap slightly?

3.   Allow to cool before carefully peeling a corner of the paper backing away from one end of the tracing  – just a little bit – this will make it easier when it comes to peeling the paper off later. 
Peel back a corner of the paper before cutting out the word .
This will make it easier to peel the paper off once the fabric is cut out.

4.   Now cut out your word accurately as one piece - do not cut out each separate letter - just cut around the outside edge of the word.  You also need to carefully cut out the middle of some of the letters – I use a small pair of embroidery scissors for this part.

5.   Peel the backing paper away starting with that corner you have pre-peeled.  Take care not to stretch the word out of shape.  Once all backing paper is off, place the ‘Christmas’ centrally onto the 18” x 6” backing rectangle. 
 

6.   When happy with the placement fuse in place.  Stitch around the letter by hand or machine.  Don’t forget to stitch the cut-out middles too! 
Stitch around the middle of the letters.
7.    Layer the backing, batting and ‘Christmas’ top before quilting around the ‘Christmas’ word.  Finally trim batting, backing and top before binding using your preferred method. 

And there you have it.   A lovely addition to any table this festive season.  


Until next time ........ 

Sunday 29 November 2015

Farmer’s Wife 1930s Quilt Blocks 21, 22, 39, 79 and 80

Farmer's Wife Block 39 - Grandma
We are still on the ‘C’s for week 11 of the Very Kerry Berry sew-along .....

Block 21 – Carrie.  This was a nice easy paper-pieced block with minimal seam matching.  Just the center seam needed matching.  
Farmer's Wife Block 21 - Carrie (paper-pieced)

Block 22 – Cat.  Another lovely block.  Notes in book read “nice to paper-piece the individual sections as I strip-pieced them.  One seam is not quite right but it is good enough”.  
Farmer's Wife Block 22 - Cat (paper-pieced)

Good enough is the standard I am going for with these blocks as some of them are very, very tricky.  Besides I would rather have a finished quilt with a few wonky seams than a part-finished ‘perfect’ quilt top.

Anyway, onto the Gnome Angel sew-along.  Three blocks this week:

Block 39 – Grandma.   This block was a little tricky as the pattern is not obvious especially when paper-piecing it.  “Thank goodness I marked the colours on the templates.”   Some of my fellow sew-alongers have changed the layout to make it more symmetrical but I am happy with it.  Just make sure you mark the templates before you start so you know which fabric goes where.
Farmer's Wife Block 39 - Grandma (paper-pieced)

Block 79 - Patience.  I am surprised this block wasn’t one of the very early blocks as it is really a simple (very simple) nine-patch.  I had this one made weeks ago.
Farmer's Wife Block 79 - Patience (patched)

And finally ....  Block 80 - Patricia.  Yet again a very simple block that can be patched easily.  It is based on the same nine-patch grid but with half-square-triangle corners. 
Farmer's Wife Block 80 - Patricia (patched)

So there it is, another week and another five blocks.  They are soon mounting up and I have started to sash them.    
Sash-as-you-go (SAYG) - always a good idea for me.
Until next time ..................

Sunday 22 November 2015

Farmer’s Wife 1930s Quilt Blocks 19, 20, 46 and 90

Farmer's Wife Block 19 - Carolina (paper-pieced and patched)

This week’s blocks for the Very Kerry Berry sew-along were:

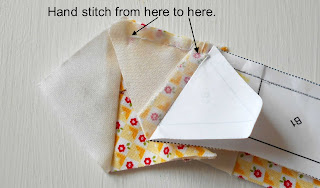
Block 19 – Carolina.  I had tried to paper-piece this block before and it didn’t work out due to the eight inset ‘Y’ seams.  So this time I paper-pieced most of the block except for the ‘Y’ seams which I hand-stitched.  It worked perfectly.  And to save you any hassle I've briefly laid out how I did it ........

1.         Firstly – and most importantly - do not stitch into the seam allowance at all for this block. 

2.         Paper-piece the five individual sections (A, B, C, D and E).  Then join the sections by machine-stitching the straight seams only and hand stitching the curved sections.  What this means is you join section A and B together by machine stitching only the straight A7/A1/A2 to the B4/B1/B2 seam.  
Machine stitch only the straight seams.

Fold B3 and B5 paper out of the way and pin A5 to B3 and A9 to B5 as shown.
Fold the paper out of the way on both the back and front 

Then it is a simple case of hand stitching A9 to B5 and the A5 to B3 (two 'Y' seams). 
Hand stitching your 'Y' seams is an easy and painless process

Press carefully before moving on to your next seam:
Spot the 'Y' seam?  Your block won't lay flat until all sections are sewn together.

And that is how I came to construct a block with eight 'Y' seams without using my seam ripper once!
Section A and B - two 'Y' seams done only six to go!

3.         Repeat this project to join section D to B by machine-stitching the B1/D1 seam segment only.  Hand-stitch D3 to B4 and B2 to D5.

4.         Join section C to A by machine-stitching only along the straight A7/A1/A2 to C2/C1/C4 seam and then hand stitch A10 to C3 and A4 to C5.

5.         Finally join section E to section C by machine-stitching just C1 to E1.  Then hand stitch C2 to E5 and C4 to E3.

Block 20 – Caroline.  This block has been covered already when it came up on the Gnome Angel sew-along.  To recap – I patched it using half-square-triangles.  It is one of my favourite blocks. 
Farmer's Wife Block 20 - Caroline (patched)

For the Gnome Angel sew-along there were just two blocks this week:

Block 46 – Jewel.  I didn’t like the look of this block in the book and I wasn’t sure it would make it into my finished quilt.  I do not like optical illusion blocks – I don’t know why – I just don’t.  I made this block using some of my favourite scrappy fabric and machine paper-piecing.  It went together well.  But I don’t like it.  I am certain now that this block won’t be in the finished quilt. 
Block 90 – Sara.  I paper-pieced this block in two fabrics and I love the result.  It is one of the versatile blocks that can be sashed straight or on-point.  Notes in my journal read “I cut fabric into squares and triangles before starting so that paper0piecing was quick (one hour)”. 
You can find all the blocks made so far here or on my Farmer's Wife 1930s Pinterest board.   So until next time...................

Sunday 15 November 2015

Farmer’s Wife 1930s Quilt Blocks 17, 18, 2, and 76

Farmer's Wife 1930s Block 18 - Carol

This week’s blocks for the Very Kerry Berry are:

Block 17 – Bride.  I was unsure about the red check but the response on Instagram has convinced me.  The paper-piecing was pretty straight forward and worked out perfectly.  My journal notes in the book read “Hate those little triangles but it turned out lovely”.
Block 17 - Bride

Block 18 – Carol.  I paper-pieced this block using green and blue scraps for the half-square triangles.  “Very lovely, very pretty”. 
Block 18 - Carol 

For the Gnome Angel sew-along there were three blocks this week:

Block 2 – Aimee.  This was week 1’s patched block for the Very Kerry Berry sew-along so another easy start to the week.  It was a tricky block to patch using the templates and I think I prefer paper-piecing tricky blocks.
http://thepatchsmith.blogspot.co.uk/2015/09/farmers-wife-1930-sampler-quilt-blocks.html
Block 2 - Aimee

Block 76 – Nancy.  I paper-pieced this block in two fabrics I wouldn’t normally put together.  Notes read “Okay block” – but that is referring to the construction. The finished look is one I love and this has become a favourite block of mine. 
Block 76 - Nancy - pretty in prints

If you want to see over 50 of the blocks I have made so far you can find them all on my Farmer’s Wife page.  They are also on my Farmer’s Wife Pinterest board.

So until next time...................

Thursday 12 November 2015

The JOY of Christmas Mug Rugs

A JOYful Mug Rug Collection
It is never too early to start making preparations for Christmas and it is never too early to snatch some time to indulge in a little fabric craftiness.

With that in mind, I have added the JOY Mug Rug pattern to my Etsy shop especially for such moments.
Patchwork JOY Mug Rug
You can use whatever fabrics you have to hand to create the perfect resting place for your coffee cup and cookie. 

Use whatever fabrics you have to create a lovely little gift.

The JOY mug rug also makes an ideal ‘thank you’ gift for a teacher, friend or colleague.  
Give a JOYful gift this Christmas
This pattern, like all Patchsmith patterns is just $2.50 so how about it?  Fancy joining me for some mug rug fun?

Saturday 7 November 2015

Farmer’s Wife 1930s Quilt Blocks 15, 16, 1, 57 and 62

 
We are on week eight for the Very Kerry Berry  so the blocks for this week are:

Block 15 – Blossom.  I paper-pieced this using 2½” scrap squares for the blossom on the tree.  My journal notes in the book read “a lot of work but easy enough”. I really love the scrappy look.
Block 15- Blossom

Block 16 – Bonnie.  This is a simple patchwork block that has already been covered on week one of the Gnome Angel sew-along. 
Block 16 - Bonnie

For the Gnome Angel sew-along there were three blocks this week:

Block 1 – Addie.  This was the very first paper-pieced block for the Very Kerry Berry sew-along at the end of September so an easy start to my week. 

Block 57 – Margaret.  I patched this block using half-square-triangles.  Notes read “Pretty block”.  I love this block and really enjoyed making it.
Block 57 - Margaret.

Block 62 – Milly.  Another half-square-triangles block but by the end of the block I was a littled tired of making them.  Notes read “All those points and seams!”. 
Block 62 - Milly

I have been making more blocks as part of my Block-a-Day project and you can see them all on my Farmer’s Wife page.  They are also on my Farmer’s Wife Pinterest board.

I am in the throws of joining the blocks made so far and I have decided to set half straight and half on-point.  The inspiration for this is Lolly Quiltz who has a really good way of setting the blocks.  Lolly cuts the sashing bigger than needed and you trim your blocks to size - this is perfect if some of your blocks are not quite 6½" or they are not square

I’m still having fun and am loving both sew-alongs.  The tutorials are brilliant and the community for both is so helpful. 


Until next time...................

Friday 30 October 2015

Farmer’s Wife 1930s Quilt Blocks 13, 14, 41 and 45

This weeks blocks for the Very Kerry Berry sew along are two that I have already made for the Gnome Angel sew-along ......

Block 13 – Belle.  English paper-pieced. 
Block 13 - Belle

Block 14 – Betty.  Patched. 
Block 14 - Betty

For the Gnome Angel sew-along we added another two blocks.  First up was Block 41 – Granny.  I paper-pieced this block and took a very quick shortcut.  
Block 41 - Granny
Here is how I simplified the paper-piecing construction ..... (note:  you will need the templates from the Farmer's Wife 1930s book – the diagrams shown here are for illustration purposes only and are not to scale).

Print out the eight paper-piecing templates that are on the CD that came with the book and cut out each one. Stick the templates together (A to H, C to B, D to E and F to G) to create four corner units that should look like this:
Join the templates to create four corner units.
(Do not print this diagram - it is not to scale or size.  Use the templates that come with the book)
Next you need to draw a line that runs from the corner of the square up to the diagonal as shown by the dotted line below. 
Draw a line from the corner to the diagonal.
(This diagram is not to scale or size.  Use the templates that come with the book)

Then it is a case of simply paper-piecing each corner unit in the following sequence.  Sections 2 and 3 are the same fabric whilst square 1 is a contrasting fabric (see the book for details).
Paper-piece the block in the order given - just two seams.
Use the templates that come with the book - this diagram is not to scale or size.

I have marked the four sections on my photo below so that you can see how it goes together.   

The other block was Block 45 – Jenny.  I patched this block using quick corners. You can find a tutorial over at She Quilts a Lot showing how.
Block 45 - Jenny
It was a simple make and I posted a photo to my Instagram feed.  People were too polite to mention that I had stitched a corner the wrong way round but once I spotted it I was able to just spin the corner.
Block 45 - Naughty Jenny - see that top right-hand corner!
I have set up a page for all my Farmer’s Wife 1930 blocks (see tab above) and will be adding to this collection every week.  Alternatively you could head on over to my Farmer’s Wife Pinterest board.


Until next time......