Tuesday 14 December 2021

No Binding Mug Rug

Celebration Candles Mug Rug minus the binding

If you don't like binding small quilts or mug rugs - don't.  There is a simple way to finish your mug rugs without having to bind them.  (However, if you do like the finish that binding gives, check out my free handout on the three most popular binding methods HERE.)

Some people like to bind and some people don't

To skip the binding, make up your mug rug top as per the pattern.  When you are ready to quilt the mug rug, omit the backing material and placing the batting behind the mug rug top.  Quilt as desired.  If you are making a QAYG mug rug, like the Celebrations Candle mug rug, the quilting would have been completed as you stitched the mug rug together.

Nearly finished - just need to applique the flames.

Once the quilting is finished, trim the batting to the same size as your mug rug top.  Place the backing rectangle, RIGHT SIDE FACING UP, on the work table.

Place your backing rectangle right side facing up

Place the quilted mug rug top, RIGHT SIDE FACING DOWN, onto the backing rectangle.  Pin or baste to stop the two layers moving, ensuring you keep both flat and crease free.

Place the quilted mug rug top right side facing down

Stitch around the mug rug top, through all layers, using a 1/4" seam allowance, leaving a 2-3" gap along one side of the mug rug.   TipMake sure to overstitching securely at the beginning and end of your stitching to stop the seam coming undone when turning the mug rug out.

Trim the backing rectangle to the same size as the mug rug top and trim the corners before turning the mug rug right side out.  

The back of the mug rug will hide all your thread ends.

Finally, press and stitch the opening closed.  I find little hand-stitches help the opening remain invisible.

Very small hand stitches close the opening

And there you have it.   A quick and easy way to finish a little quilt or mug rug.

Grey and silver make a sparkling Christmas mug rug.

Wishing you all..........

A VERY HAPPY AND HEALTH CHRISTMAS.

Thursday 26 August 2021

The Patchsmith's QAYG Log Cabin Coaster Tutorial

A scrapilicious quartet of coasters

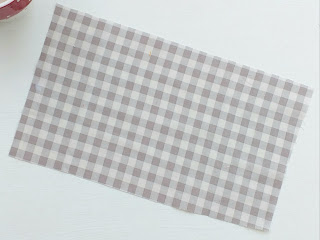
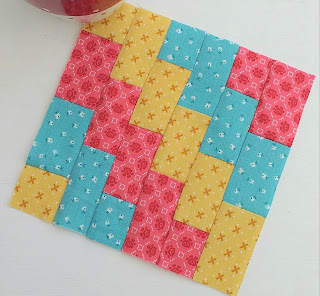
I like to use fabric scraps to make something functional and good looking.  So I thought I would share with you how to whip up a quilt-as-you-go log cabin coaster for your desk or coffee table.

Binding scraps have never looked so good!

Instructions are given for a finished coaster measuring 4½” square.  To start you will need to cut:

One 1½” square for the middle;

Eight 1¼” x 5" strips of fabric for the logs;

One 7" square of batting:

One 7" square of backing fabric;

One 1¼” x 20" strip of fabric for the binding.

NOTE:  I prefer to stitch my logs into position and then trim them - it allows me to swap the order around as I go.   However, you may prefer to trim your logs before stitching them, in which case you will need to cut one log 1¼” x 1½”; two logs 1¼” x  2¼”; two logs 1¼” x 3", two logs 1¼” x 3¾” and one log 1¼” x 4½” and ignore all reference to trimming logs in the tutorial.

1.    Firstly, position the 1½” square in the middle of the batting as shown.

Position center square in middle of wadding.

2.    Next position the first log so that it aligns with the top left-hand side of the middle square, right sides together. 

Align first log with left-hand side of center square

3.    Stitch the log to the middle square along the 1½” side.  Finger press the log open.  Note:  Do not press with an iron if using synthetic batting - it will ruin your iron.

Finger press your logs open 

4.    Carefully trim the log so that it matches the length of the middle square, but do not cut through the batting (ignore this step if you have pre-cut your logs to size).

I trim after I have added a log.

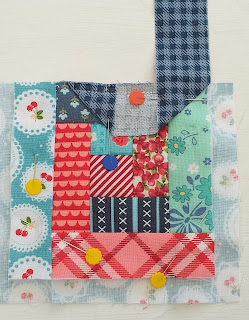
5.    Next place the second log, right sides together, along the top of the patched unit aligning the left and top edges as shown.

Keep adding logs in a clockwise direction

6.    Again stitch along the top edge of the patched unit, stopping just before the end of the center square.  Finger press the log open as before.  Trim the length of the log so that it matches the length of the patched unit.  The patched unit should now measure  2¼” square.  (Do not worry if your patchwork doesn't measure exactly this - we will square it up at the end.)

I often change the order of my strips as I stitch

7.  Repeat the stitching, finger pressing and trimming to add the logs in a clockwise direction until all eight logs have been stitched in place.  (If you want a bigger coaster just add a couple of extra logs.)

Ready for trimming

8.    Once all logs have been stitched in place trim your coaster to 4½" square.  I used the lines on my ruler to help with this but if your logs are not straight do not worry - just rename your coaster the Wonky Log Cabin Coaster - it will still look good.

I use a small rotating cutting mat for small projects

9.    Place the backing square wrong side facing up and place the quilted coaster on top with the right side facing up.  Pin or baste together so that they don't move as we bind the coaster.

10.    You can bind the coaster using your favourite binding method.  I used a 1¼” mitred binding method that I use for my mug rugs and here is how I did it. (I have a PDF on binding methods which may be helpful to print and view at the same time as this tutorial.)

11.    At the left-hand side of your binding fold and press the end into a triangle as shown below

This small step will make the binding neat

12.    Position the folded triangle, right-sides together, approximately half way along the top edge of the coaster aligning the raw edges.  Pin in place at the start and place another pin ½" away from the right-hand edge of the coaster.

I use pins to keep my coaster and backing smooth 

13.    Stitch the binding in place using a ¼" seam allowance, stopping when you reach the right-hand pin.  Cut the thread and remove the coaster from your sewing machine.  Trim the backing fabric along the top edge of the binding to the same size as the coaster.

14.    Fold and pin the binding 90 degrees upwards at the right-hand corner of the coaster as shown.  The right-hand point of the folded triangle should meet with the right-hand corner of the coaster.  

It looks weird but it works!

15.    Now fold the binding down over the folded corner so that the right-hand edge of the binding aligns with the right-hand edge of the coaster.    

The fold in the binding aligns with the top edge of the coaster

16.    
The fold at the top should line up with the top edge of the coaster and the binding strip should lie on top of the coaster right-sides together as shown.

You can't see the triangle fold but it is still there.

17.   Place a pin at the very top to keep the fold securely in place.

Pinning keeps everything in place

18.    Stitch the binding to the right-hand side of the coaster using a ¼" seam allowance.  Cut the threads and remove the coaster from the machine.  Trim the backing to match with the right-hand edge of the coaster.

That is the first mitred corner done.

The top right-hand corner of the binding should now look like the photo below.

Can you see how this is going to work?

19.    Repeat this process to bind the bottom and left-hand edges of the coaster. 

20.    When you get to the final corner, fold and pin the binding at the corner as you did for the previous three corners.

The last corner is just the same as the others.

But this time cut the binding length so that it ends  ½" past the raw edge of the folded triangle.

Cut the end of the binding just passed the triangle fold

21.  Stitch the binding in place from the corner to the end of the binding. 

Phew - all four mitred corners done

22.  Fold the binding away from the middle, towards the back of the coaster.

Now you can see why the fold at the beginning is a good idea.

23.    At the back of the coaster, turn under ¼" along the raw edge of the binding and slip-stitch in place.  I also put a small stitch at each corner to secure the mitred corner.

Look closely and you can see the triangle fold at the beginning.

And there you have it - one log cabin coaster. You can download a PDF showing three different binding methods, including the mitred binding method below. 

COASTER AND MUG RUG BINDING METHODS

Don't forget to tag me on Instagram if you use this tutorial (@thepatchsmith).  

Until next time .....

Monday 26 July 2021

The Patchsmith's Scottie Dog Mug Rug

Now available as a single pattern

Many of my patterns are sold in book collections in PDF format via Etsy or in paperback format via Amazon.  

However, I also sell many patterns singularly, including one or two that are included in a book.  With this in mind I have re-released an old favourite today as a single PDF pattern – The Patchsmith’s Scottie Dog Mug Rug.

Original Scottie Dog Mug Rug created in 2013 

This is a great pattern for beginning mug rug makers.  It won’t matter if your patchwork seams don’t meet – it will still look good. 

Felt is a great fabric choice for new mug rug makers

You can also use felt for the Scottie dogs making it super easy to sew by hand or machine (although you can use fabric if your prefer).

And a mug rug is an excellent project for the beginner and experienced quilt maker alike, as you can use whatever fabrics you have to hand.  Try new combinations to see if they work before embarking on a larger pattern.  Or make a mug rug to co-ordinate with your room.

Try new fabric combos whilst creating a functional mug rug

So join with me to create a world that is full of fabric, fun and friends.

Until next time …..


Wednesday 14 July 2021

Chevron Brick Wall


A pattern is seldom just one way of making something.  It is often a starting point.  You can follow the pattern exactly or your can play with it and make it uniquely yours.  And that might be as simple as changing the order of fabrics.


Take my Brick Wall block from The Patchsmith's Sampler pattern book.  In the book I use different fabrics for each brick and I love the scrappy look.

I even used the pattern when making a gingham road for a sew-along a few years back.

Who wouldn't love a gingham road?

But today I wanted something a little more co-ordinated so, this time I used just three fabrics.  And what a difference! 


You wouldn't think it was the same pattern.  That is the fun of this scrap happy block (and that there is no seam matching required).

If you want to mimic the chevron brick wall you will need to choose three contrasting fabrics.  From each of them cut five of block A and two of block B as detailed in the pattern.

Tip 1:  Lay the cut blocks out on your sewing table in the order you want them before stitching.

Tip 2:  For a slight variation rotate the block a quarter of a turn as shown at the top of this blog.


Until next time....


Monday 12 July 2021

Scrapilicious Patchsmith Sampler Blocks


It has been a while.  Truth be told I broke my elbow mid February and haven't been unable to do much of anything.  But I have just started to ease myself gently back into some sewing.  

I need to practise both cutting and sewing but cutting is proving the most difficult and painful. Thankfully, I have a stash of scraps and a couple of favourite blocks from my Sampler Quilt Blocks pattern book.

Available via Amazon

First up is the Chunky Log Cabin.  

Block 32 - Chunky Log Cabin Block

This is block 32 in the book.  I remade this block with the offcuts that I had available and, I have to say it turned out lovely.

Chunky Log Cabin Block

There is also a Night and Day Log Cabin block in the book but I am building up to cutting thinner strips as my elbow progresses.  

Block 25 - Night and Day Block

However, I did take the opportunity to play with Lori Holt's Haystack Block turning it into a night-and-day version.

A 'Night-and-Day' Haystack Block

Next I thought I would try a little bit more cutting and sewing and chose block 33 from The Patchsmith's Sampler Quilt Blocks book - the Scrap Box.  

Block 33 - Scrap Box

I did have four small half-square triangles already in my scrap box together with another eight perfectly sized squares.  So the cutting was too difficult. 

Scrap Box alternative with HST corners

I will remake this block very shortly using an alternatively to the Kona Snow background fabric - just for fun.

Spring-time Chunky Log Cabin

These blocks are perfect for beginners as it really doesn't matter if your seams, or cutting, aren't accurate - the blocks will still look good.

So I better get back to practising some more as I have new designs I want to create.  Until next time....