Wednesday 18 September 2019

Granny's Garden Bedrunner Block 11

Granny's Garden Block 11

Block 11 of Granny’s Garden Sew-along is a Dresden style block created using half-square triangles (HSTs).

Lori creates the half-square triangles using eight 4½” squares.  It is a very clever method – click on the picture below to visit her blog.

However, as I was short of time and I am using quick-fuse applique I created the pinwheel for the Dresden using just four 5” blocks – two pink and two red. 

I marked a line diagonally on the back of both pink 5” squares and then placed them, right sides together, onto the red squares.  Next I stitched a scant ¼” either side of the marked line.
Mark a diagonal and stitch either side

Then it was simple a case of cutting along the marked lines and pressing open to create four half-square triangles.  I trimmed my blocks slightly so they measured 4½” square.  
Then cut along the marked line

Next I stitched the four units together to create a pinwheel block.  This will make up the Dresden section of Block 11.  
Do not worry if your center seams do not match as they will be covered by further applique shapes.

Once you have traced Sew Simple Shape I25 onto the paper side of the fusible webbing, mark lines across the tracing from one side to the other as shown.  
Marking the lines across Shape I25 will help when fusing the cutout.

Position the fusible webbing tracing onto the WRONG side of your pinwheel patch, matching the seams with the marked lines as best as you can.  Fuse in place.
Line up the marked lines with the seam lines as best you can.

When cutting out the Dresden flower I found it easier to start at the middle of each Dresden section and cut down towards the intersection.  That way, if any of my seams didn't match exactly I was able to adjust it so that the intersection met at the seam. 

Once you have your Dresden it is a simple case of placing it centrally on the white circle before fusing and stitching it in place.  I did this before adding pieces I23 and I21.  
Block 11 - A pretty Dresden Flower
You can use the 5” double-HST method for blocks 20, 30, and 31 but it will not work for next week’s Block 14 – you will need eight different 4½” squares for that block.  But more on that later.......

Wednesday 11 September 2019

Granny's Garden Bedrunner Block 9


Granny's Garden Block 9

Week 3 of the Granny’s Garden Quilt sew-along brings the first two-block week for my Granny’s Garden Bedrunner.  This week I am making Blocks 9 and 11. 

If you are using Lori's interfacing-applique method then just pop over to Lori’s post and see how it is done.  

But, if like me, you are using quick-fuse applique then here is a tip to reduce the number of layers you need to sew through.

After tracing Sew Simple Shape I28 position your 6” circular template centrally onto the tracing and trace around it.  
Center the 6" circle within the I28 flower shape

Cut out roughly around the inner tracing (the 6” circle tracing) - do not cut out accurately at this stage.  
You can use the inner cutout of fusible webbing for your hearts and ovals as we did for Block 1.

Next fuse the flower ring onto the wrong side of your chosen fabric (in my case TealGranny Kisses) before cutting out accurately along the traced lines to create a flower ring.  Fuse this centrally onto the white/cream circle. 
Place the flower ring onto the white/cream circle..
Then stitch the flower ring into position before placing the center applique shapes. 

When positioning the pink hearts and ovals place the hearts first at 90° to each other.   Then place the yellow ovals leaving a little gap between the hearts and ovals.  If you find the ovals are touching the hearts move the hearts away from the center a little until there is a gap between the shapes.  
Stitch the hearts and ovals into position before fusing the center circle.

Stitch the hearts and ovals into position before fusing and stitching the center circle in place to complete Block 9.  Taa-daa!
Block 9 looking oh sew pretty.

I will crack on with Block 11 using Lori’s excellent shortcut to create the Dresden donut.  Until then ......

Wednesday 4 September 2019

Granny's Garden Bedrunner - Block 5

Granny's Garden Block 5

It is week 2 on the Granny’s Garden sew-along and this week is another one-block week for my bedrunner – Block 5.  (I listed the fourteen Granny's Garden blocks I am using HERE).

Block 5 is a flower block very similar to Block 1 which I made last week.  
Granny's Garden is blooming lovely!

So nothing new to report here except Lori created the leaves using two fabrics – a method I call “strip applique” and one I use often in my mug rug patterns.
The teacup uses a simple strip-applique.Full details can be found in this lovely little pattern.

However, I just adore the Green Granny Roses fabric so my leaves have not been stripped!
I tucked the leaves under the stem everso slightly.

A very quick tip: when placing your white circles on the background fabric try to center them as best you can.  I fold the background squares in quarters and lightly press so I know where the center is.  
Lightly finger press the background squares to help when centering your applique.

But don’t worry if your circles aren’t perfectly centered as the background squares are cut bigger than needed and you can trim them to size later on. 

Next week I shall be creating two blocks – Block 9 and Block 11 – neither of which are flower blocks.  Be sure to come back and see how I create Block 9 whilst keeping the number of layers of applique to a minimum.  Until then ..... 

Monday 2 September 2019

Granny's Garden Bedrunner - Block 1

Granny's Garden Block 1

Lori Holt kicked off The Granny’s Garden SAL with blocks 1 to 4 last week whilst I was on holiday.  Thankfully I only need one block from this set of four for my Granny’s Garden bedrunner.

Block 1 is a very pretty flower block but first here is a tip to help reduce fusible webbing costs.

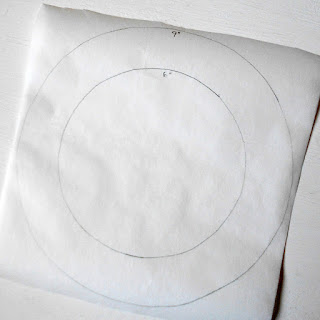
Trace a 9” circle onto the paper-side of the fusible webbing and then trace a 6” circle centrally inside.  (Don't worry if your inner circle is not centered exactly – it is not important).  
Saving on fusible webbing for the white/cream circles

Make a slit in the centre of the tracing and cut out the 6” circle.  DO NOT throw the middle circle away – you can use this for the flower petal tracings. 
Cut-out and keep the middle.

It is then a case of simply fusing the 9” donut onto the WRONG side of your chosen cream/white fabric before cutting out around the outer 9” traced line.   Peel back the paper and position centrally onto the background square.  Fuse and stitch in place.
A fusible webbing donut!

I fused a lightweight fusible interfacing to the back of Kona Snow to reduce any show through but this is not essential (once the applique has been applied you will not notice the background showing through).
The background may show through at this stage but it won't be noticeable once applique has been applied (see photo at the top of this blog)

So onto Block 1. The flower for this block is made up of six hearts (Sew Simple Shapes piece I14). You can do as Lori and I have done and applique the hearts individually.  However, if you are hand-sewing you may wish to cut down the amount of sewing - in which case you can trace, fuse and applique the hearts as one big flower head as shown below.  
One big bloom still requires six petals but you only cut out the outer edge.

Either way use the 6" fusible webbing off-cut left over when you cut out the centre of the traced 9" circle mentioned above.
Six petals or one big bloom - the choice is yours.

As for the stems – I traced several ¼” rectangles – each approximately 7” long, onto a piece of fusible webbing and fused it to the WRONG side of a piece of green Kona fabric .  This way, I can cut a stem as and when I need it. 
Each stem is ¼” wide and 7" long.

Once all the pieces have been fused and cut place them onto the circle.  Position the leaves so that they lie slightly under the stem.  I also left a gap in the petals for the stem but this is your quilt – you decide what is pleasing to your eye.

Block 1 - fused and ready for stitching

When happy with the placement fuse and stitch in place.
Blooms in Granny's Garden

And there we have it – Block 1 of the Granny’s Garden Bedrunner done. Lori is releasing the tutorial for week 2 of the Granny's Garden SAL today which covers blocks 5 to 8.  I shall be needing just Block 5 so be sure to come back on Wednesday to see how beautiful Block 5 looks using quick fuse applique.