Monday 31 December 2018

Patchsmith Sampler Block 43 - Chain Link

Patchsmith Sampler Block 43 - Chain Link
This week’s Patchsmith Sampler sew-along block is all about placement.  The stitching of Block 43 ‘Chain Link’ isn’t difficult – just squares and rectangles.  However, the block depends on you placing those squares and rectangles correctly.

The pattern diagrams show four primary colours but you may choose instead to use four different patterns or four shades from the same colour.  
All Patchsmith patterns come with easy-to-follow colour diagrams

Whether you use primary, solid or patterned fabrics there are several ways you can ensure you get the placement correct. 
Use four fabrics from the same collection for this fun block.

I find laying my pieces out onto the worktable in the order that they will appear in the final block works just fine (use the colour placement chart at the beginning of the pattern instructions).

Alternatively you could colour four small paper squares using red, green, blue and yellow pencils.  Sort the four fabrics once you have cut all the shapes.  Then simply position a coloured square on top of each of the four fabrics to correspond with the placement chart.
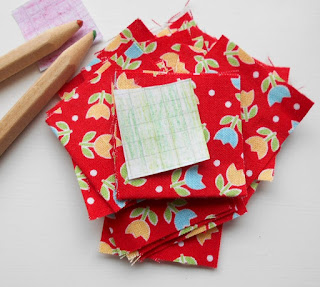
For this block four simple coloured squares work well to keep the fabrics sorted

A quicker way is to use Alphabitties available from The Fat Quarter Shop - they are handy for a whole range of projects.
Alphabitties - a great quilting tool from the FQS

Once you have sorted your fabrics, simply follow the block directions and diagrams to create a unique Chain Link block.

I would love to see a copy of your block over on Instagram (#block43chainlink) or in the Flickr group.  

Next week we will be making Block 45 - 'St Louis Star' as we have already completed Block 44 'Autumn Daisy' when we made Block 35 - Topiary Tree.

Block 44 - Autumn Daisy tutorial can be found HERE

That just leaves me to wish you all .......

A VERY HAPPY NEW YEAR


Wednesday 19 December 2018

Farmers Wife 1920 Blocks 29 and 30

Block 29 - Economy
I am not sure which block we are up to in the Gnomeangel Farmer's Wife 1920 sew-along - it has all got a little confusing as Angie's last post was for block 26 back in November.  I think we should be up to Block 34 or thereabouts.

Block 29 – Economy (shown at the top of this blog)
I love this block - I loved stitching it, the fabric combo and how it turned out.  My notes scribbled in the book reflect this: "So simple - so elegant".

Block 30 - End of Day
This block was "easy to patch using block 13 from my Patchsmith Sampler book".   All that was needed was a turn of the four quarters before stitching them together. Click on the photo below to see how easy it was to patch.
Patchsmith Sampler Block 13 - Slice-and-Dice

Next week I will be back with another two blocks.  Until then .....

Monday 17 December 2018

Patchsmith Sampler Block 42 - Fir Tree

Block 42 - Fir Tree

Have you picked your tree yet? Decorated it? With Christmas just around the corner it is great to take a short break in the sewing room – away from the busyness. Just enough time to make a little 6” Fir Tree block which has minimal seams and seasonal sweetness.

You can decorate your tree with three different fabrics as shown in the book and above - or you can keep the unity by using one fabric for all three branches.
Block 42 dressed in Fig Tree fabric
Either way this is one tree you will not want to put away when the season is over. And if you are feeling really generous, head over to Instagram (#block42firtree) or the Flickr group and share your creations with the world.

Block 43 - Chain Link
Next week when we will I will be linking together a lovely little chain block. Until then it is back into the fray for me - the fray of fabric scraps that is. 

Monday 10 December 2018

Patchsmith Sampler Block 41 - Checkerboard

Block 41 - Checkboard

This week’s block is one of those blocks that looks more complicated than it is especially as it can be created using my slice-and-dice method. 

You start off with two strips cut from two fabrics (total four fabric strips).
Start with four strips from two fabrics

Stitch them together along the long edge to create a single patch.

From this patch you cut four strips.
Tip:  Do not press at this stage as this will give you wiggle room when matching the strips in the final step.
Trim one end and cut your strips from there..

Turn two of the strips upside down.
By not pressing you will have wiggle room for seam matching

 Stitch the strips together to create a Checkerboard block.
Completed Block 41 - Checkerboard
I look forward to seeing your blocks – just tag #block41checkerboard or #thepatchsmith on Instagram.  Alternatively post a photo to the Flickr group.


Until next week .....

Monday 3 December 2018

Patchsmith Sampler Block 40 - Saltbox House

Block 40 - Saltbox House
This week’s block is an excellent applique block for a beginner because crooked and wonky add to the rustic appeal of Block 40 - Saltbox House 

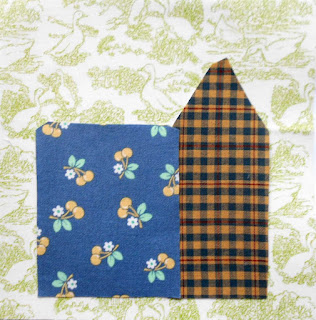
This block comes with a layout sequence detailed in the pattern and shown in diagram format on the applique page.  But I thought it would be fun to show you photographs of the sequence.

First you need a 6½” background square and follow steps 1 and 2 of the pattern to create your applique fabric shapes. 
A 'Gooseberry' background (by Lella Boutque)

To place the Saltbox House you need to start with the pitched roof section and position it 1” in from the right-hand edge and ½” up from the bottom edge of the background square.
Positioning is easy by lining up a ruler with the block edge

Next add your window wall section so that it overlaps the pitched wall everso slightly.
Do not fuse the pieces until the roof has been added

Then add the roof so that it overlaps both the pitched and the window walls as shown.
Adjust the pieces if necessary before fusing and stitching.

Tip:  If hand-stitching you could fuse and stitch the windows onto the window wall and the door and star onto the pitched wall before stitching them to the background square - just make sure to leave the paper on the back of the wall pieces until you have fused the smaller pieces in place.

Using dark thread to add a rustic touch
Then it is just a case of stitching the pieces in place.  Use any stitch you like and embrace the odd wonky stitch or uneven shape - it all adds to the appeal.  To add a rustic appeal to a machine-stitched house use dark thread otherwise, keep your house neat and tidy with co-ordinating thread.

Coordinating thread will keep your house neat and tidy

This week’s block goes very well with next week’s sliced patchwork block - the Checkerboard.
Block 41 - Checkerboard
In the meantime I look forward to seeing your blocks – just tag #block40saltboxhouse or #thepatchsmith on Instagram.  Alternatively post a photo to the Flickr group.

Until next week .....

Saturday 1 December 2018

Farmers Wife 1920s Blocks 25, 26, 27 and 28

Block 25 – Cups and Saucers
Block 25 - Cups and Saucers
I combined paper-piecing templates 2, 4 and 5 (from the Yahoo group templates) on Unit A and started with that piece.  It just cut down on some of the seam matching.  

Block 26 – Cut Glass Dish
Block 26 Cut Glass Dish
I have a dislike of 6" blocks that contain so many half-square triangles as I get bored very easily.  However, this is where paper-piecing comes into its own as notes state - "very glad I am that I paper-pieced it as it made seam matching easier".  Leave the papers on until the block is complete.

Block 27 – Darting Birds
Block 27 - Darting Birds
This block "took two days because I was busy with other things".  It is not difficult but yet again, leave the papers on until the block is complete.  I didn't follow the paper-piecing templates as I found them confusing.  Instead I paper-pieced four quarter bear paw blocks - it was easier and quicker.

Block 28 – Duck and Ducklings
Block 28 - Duck and Ducklings
Notes state simply "nice block to make - very pretty in pink".  And so it was and is. I now have enough blocks to sash another row.  So 'onwards and upwards' as we say here in England.  You can see all my Farmers Wife 1920s blocks HERE.  And you can find all my Farmers Wife 1930s blocks and links through to their hints-and-tips HERE..

Monday 26 November 2018

Patchsmith Sampler Block 39 - Beehive

Block 39 - Beehive

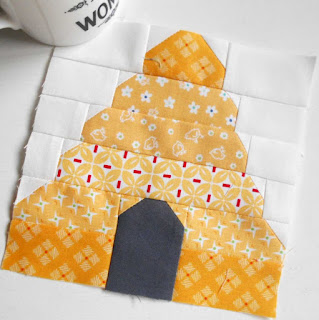
Summer may be a distant memory for many at this time of the year but we can add a summer glow through the fabrics we use and the blocks we make.  This week’s block is a good example – the Beehive.

The Beehive block makes good use of yellow fabric scraps as it looks its best when each layer of the hive is made using a different fabric.  

Putting the beehive together is a case of layering the indidividual sections.  And my tip for this week's block - don't worry if your layers do not meet exactly – the block will still look good.  Remember that perfection can sometimes be the thief of joy. 
https://www.pinterest.co.uk/pin/568860996680441283#
Block 39 Beehive is a great scrap buster
I hope you enjoy this block.  I would love to see any you make over on Instagram (#block39beehive) or in the Flickr group.  Until next week .....

Tuesday 20 November 2018

Patchsmith Sampler Block 38 - Night Owl


Block 38 - Night Owl

After last week’s Elephant block we have a nice easy ‘quick-fuse’ applique block this week – Block 38 ‘Night Owl’.

This block was created based on my Night Owls mug rug pattern.  If you want to turn this block into a fun mug rug just add a 3” x 6½” rectangle of novelty fabric to either side of the block before quilting and binding.   
Night Owls Mug Rug Pattern

Like Block 36 ‘Moonlit Star’ you have the option of having the moon facing to the East or to the West.  The only tip I have for you is to place the moon so that there at least ¼" between the moon and the edge of the block to allow for seam allowance.

And remember - owls can come in a multitude of colours ....

Next week we are back to patchwork for a scrapilicious beehive.  
Block 39 - Beehive
Until then......

Friday 16 November 2018

Farmers Wife 1920s Blocks 21, 22, 23 and 24

Block 21 – Contrary Wife
Block 21 - Contrary Wife
My notes state that "There is nothing contrary here.  Very pretty, very easy block to patch."  I cut the squares for the half-square triangles to 3½"and trimmed them down to 2½" once I had made them.  

Block 22 – Corn and Beans
Block 22 - Corn and Beans
Although my block is more carrots and pumpkins! I paper-pieced this block by constructed the center square (which is on-point) before adding four identical corner units. My journal entry states "only just to size - enjoyed making it though." 

Block 23 – Country Farm
Block 23 - Country Farm
I paper-pieced this block and it "went together beautifully." It reminds me of a summer picnic.

Block 24 – Country Path
Block 24 - Country Path
I limited the number of fabrics I used on the center square unit of this block to give it more balance. Like block 22, I created the center square (which is on point) and added four corner units.

I have sashed and stitched two rows of ten blocks together so I think that is quite enough for now.  But be sure to come back soon to check on my progress.  If you want to see all the blocks I've made so far you can find them on my Farmer's Wife 1920s Pinterest Board. 

Sunday 11 November 2018

Patchsmith Sampler Block 37 - Elephant

Block 37 - Elephant

This week we are tackling the hardest block in the book so I have lots of photos to help you.  But before I do please note the following two small amendments: 

Step 14 – you should make a diagonal mark on the (S) background rectangle 1” in from the top right-hand corner down to the bottom right-hand corner as shown in the diagram; and

Step 16 – you should add the (R) background rectangle to the right-hand side of the unit created at step 15 – again as shown in the diagram.  
If in doubt follow the diagrams as they are correct.

So let us begin.......

Step 1 is simply to mark the back of our squares for the quick corner triangles.  Steps 2, 3 and 4 is where the stitching begins as we create background quick corner triangles onto the A, B and C elephant pieces. 

We also stitch a background rectangle to the right side of the C/O unit.  (If you are ever unsure about what pieces go where just look at the diagram at the start of the pattern – it shows all the pieces.)

We continue with quick corner triangles for steps 5 and 6 as we begin to make the trunk unit.

After step 7 you should be able to see the curve in the trunk. 

Steps 8 and 9 complete the trunk with addition of a simple three-square-unit created at step 8.

At step 10 we join the trunk to the bottom head unit created at step 3.

Next we complete the head by adding the unit created at step 4 to the top of the trunk unit.  This unit should now measure 3” x 4”.  (Did you know all Patchsmith measurements are given in the format width x height?)

At step 12 we resume our quick corner triangles to start on the elephant’s ear.  Remember this is your elephant – he can have whatever colour/pattern ear you want. 

Once the ear section is made we are ready to join all three units together at step 13 to create the body of the elephant.   

Next we create the top of the ear by marking the (S) background rectangle 1” in from the right-hand corner running diagonally down to the bottom right-hand corner – look at the diagram on page 41 to see how to mark the rectangle.    Lay onto the (J) ear rectangle at right angles and stitch along the marked line

.....trim and press open .....

Next stitch the (R) background rectangle to the right-hand side of the unit created at step 15 – (not the left-hand side as stated in the pattern).  Follow the diagrams as they are correct.

Stitch the top ear unit to the top of the elephant body at step 17.

Next we make the legs (toes are optional). Follow steps 18 and 19 to create two toe units.  If you are not adding toes you will still need to complete step 18.

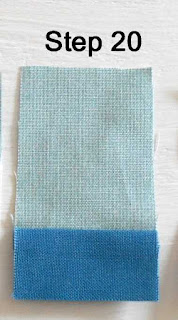
Step 20 will create two leg and feet units each measuring 1½” x 2½”.

And step 21 will join the four units created at steps 18, 19 and 20 together to create the bottom elephant unit.

You are now ready to complete the patchwork Elephant block by stitching the elephant’s legs to the elephant’s body.  

To finish add an eye to the elephant (I marked it in place first and used a simple overstitch using two strands of embroidery cotton).

Phew – there we have it.  One really cute Elephant Block.  
Block 37 - pretty in pink 

I look forward to seeing your blocks over on Instagram (#block 37elephant) or in the Flickr group.   Next week we will be back to a quick and easy applique with block – Night Owl.  
Block 38 - Night Owl