Tuesday 25 September 2012

Glorious Autumn Give-away with the Patchsmith

Spider's Web Mug Rug from the
Halloween and Thanksgiving Book 
(also available from Amazon)

The give-away is now closed but you can still make your own colourful and functional piece of fabric art to brighten the days ahead. You can find the Spider's Web and nine other wonderful patterns suitable for the Autumn season in my Halloween and Thanksgiving pattern book available via my Etsy shop or Amazon.

Or, if you are watching the pennies or only want one mug rug to cover the whole of the season look no further than my Pumpkin Patch mug rug pattern.  A lovely little mug rug to sit on your coffee table, hall table or work desk. 
The Patchsmith's Pumpkin Patch Mug Rug Pattern

It even comes with its own Halloween version:

So enjoy the start of the Glorious Autumn season and come back real soon.
 

Friday 21 September 2012

The mad, old lady covered in threads

The Patchsmith's Pumpkin Patch mug rug pattern

Autumn is just around the corner and the nights are drawing in ...... ooh, sounds like another story but I hate to disappoint – I am just waxing lyrical (again!).  It will soon be time for my daughter and I to visit the farm to pick our pumpkins.  They are all in the field waiting to be collected.  What a sight – row-upon-row of glorious orange and mustard coloured pumpkins.  But they are not in the farm shop yet so there was nothing for it - I just had to make my own little pumpkin patch to tide me over until harvest.  In fact I made two – one for me and one for my daughter, Beth.  This pattern was so quick that I made two in an afternoon.  In fact, I spent more time trying to get a good photo of them than I did stitching them.  I have added the pattern to my Etsy shop so be sure to check it out (literally!).  
Add a heart to show how much you love Autumn.

Here in England pumpkins are regarded as little more than Halloween decoration.  It they are lit  then trick-or-treaters may call, but if there is no pumpkin alight in the doorway then trick-or-treaters are not welcome.  We always have two pumpkins blazing away but last year I had to blow them out after we run out of sweeties – there were so many wonderful children all dressed up.
 
This evening I received a blog post from Eamylove in which she has co-ordinated the tea-and-cake mug rug with her pretty home (I am assuming it is pretty from all the wonderful things she has in it - though having said that I haven't seen a picture of her husband - he might be a shocker!!).   
What a clever lady Amy is - she has made the mug rug slightly bigger to give her more room for cake no doubt!   Amy has also provided a free tutorial on machine-stitched binding with a free PDF download .  It was mentioned on Craft Gossip too so don’t be left out.  I have yet to give it a go – I am a little bit daunted because Amy makes it all look so lovely, I am sure to have squiggles and wiggles and threads all over the place. 
But hey, at least I wouldn’t need a costume for Halloween – I could just go as the crazy, raggedy old lady from the village (not that I'm old you understand - it is just anybody is 'ancient' to a six-year old).
Until next time .......

Sunday 16 September 2012

The Yarn of the Red Elephants Mug Rug

Red Elephants from Animal & Pets pattern book


As I was telling Susie of Susie’s Sunroom fame, I never set out to make red elephants.  So how did it come about you may ask?  Well, let me tell you the story of the elephant mug rug .......

I had spent the week with my sister and when I returned home my work room was a mess.  My friend had taken out some built-in cupboards I had asked him to remove whilst I was away and all my things were strewn all across the room (no respect for Red Rooster fabric!)  So my first morning home was spent tidying and sorting and getting over the shame that my friend had seen my ‘magic-extra-large-Bridget Jones-style’ knickers which had slipped down the back of one of the drawers.  What could I tell him?  (Question 1 - answer at bottom of page.) 
I digress .... So, I spent the morning tidying and the afternoon rewarding myself with cream tea and ice-cream at Bosham village.  I had been home a whole day and I hadn’t even take the cover off my sewing machine – it would appear my brain was taking a break and having a rest.  However, I woke the following morning to find my mind was in overdrive – running away with ideas – well one idea in particular – elephants spouting hearts.  Strewth – what was I thinking?  Where on earth did that come from?  (Question 2 - answer at bottom of page.) 
 
I have a Moda Bonnie and Camille charm pack that I have ideas for (of course!!). I have wanted to do something major with a charm pack ever since Amy of Amy MadeThat popped one in with a mug rug swap.  So I decided turquoise elephants would be lovely.  All went well, I pieced the back from two charm squares and cut out my elephants from a turquoise and white print.  However, the elephants ears proved tricky to match up.  Too many fabrics, too much choice – as a sewist you will know exactly what I mean.  So I thought maybe plain elephants would be better – with turquoise floral ears (hey, they are my elephants and they can have floral ears if I want!!). 
I didn’t have any grey felt but I did have some grey linen which I had cut off my daughter’s cargo pants to make them into shorts.  Excellent – I was back on track (unlike this yarn).  Mid grey elephants and turquoise flowered ears.  Looking good I think to myself.  Then I added a heart – oh my, no and no and no – several choices and none of them worked.  And it was the next step that changed everything.......
If you have been following me on the Zakka trail you will know I am partial, just a tad you understand, to a bit of gingham.  Well I cut out one small, itsy-bitsy gingham heart and I lay it on the grey elephant whilst I cut out another.  
Who doesn't like a touch of gingham?

Then the phone rang – I went to answer it and when I came back – epiphany – the gingham on the grey fabric made my heart sing.
Red Elephants is just one of ten patterns from
The Patchsmith's Animal & Pets pattern book


The red gingham looked so good that I decided to change the ears – out with the floral, in with the gingham.  Woohoo – bliss.  From hereon the mug-rug was a breeze as I have so many red scraps that it was easy finding a few oddments.  As for the border I just run with the check theme and used a lovely Debbie Mumm fabric.  You may be wondering how I mitred the borders (Question 3 – answer at bottom of page .... or if you are really on the ball – click on the tab 'Mug Rug Basics' tab above and you will find more info on Binding).

So what is next for The Patchsmith?  (Question 4 – but it is the bottom of the page so that answer is here – taa-daa.)  Today I am going to listen to the birds sing, picnic in the park and DING – oh no, incoming idea – quick think of something else – DING - a village scene – really?  Gotta go – am seeing turquoise houses ... DING ... and a church .... DING .... and a shop.  Until next time ......

 ANSWERS:
1.         My explanation for the knickers – they belonged to the previous owner.  However, there is just one teeny flaw in my excuse - the previous owner was a bloke – but hey – blokes can be odd (and we all know I’m not ‘odd’ in any way – don’t we?  - and before you ask .... NO, there is not an answer at the bottom of the page it was a rhetorical question.  Plus, if you were following along, we are now at the bottom of the page – we cannot get much lower - doh).

2.         The idea came from a notebook my sister had picked up at the shop.  It was covered in elephants and my sub-conscious must have filed the image under ‘ideas-to-do-later’.

3.         Click on the page on the 'Mug Rug Basics' tab above or click here.

Wednesday 12 September 2012

Zakka Style Gets Whipped

The end is here and I am mighty sorry for it.  We all knew it would end one day but who would have thought, when we started out on the Zakka trail in April 2012 that September would come around so quickly.    The last project in the book is the Nesting Boxes designed by Laurraine of Patchwork Pottery
This project, out of all of them, is the one that I have waited for – the one I would’ve purchased the book for.  I know that some are finding it a tricky project but I have now made the small and middle boxes and I love them.  I will make them for gifts.  This week’s blog host, Kati, has constructed Christmas boxes – check them out here – they are really cool.

The Crafter’s Apprentice has devised an alternative method of constructing the boxes.  However, I followed the instructions in the book and have a few tips that might make things easier.
1.         I quilted the bottom flower twice, one small and one larger (shadow quilting).  This made my bottom firmer (if only I wasn't talking about the fabric box!).  Also, once the bottom has been constructed, iron it with a very hot iron (now I'm glad I'm not talking about my bottom - ouch!).  This will fuse the batting to the fabric making it even firmer still.

2.         Use double fold binding on the top edge.  This will make stitching it quicker and neater.  I cut 2” strips as directed in the pattern but folded it lengthwise and then aligned raw edges before stitching on.  I found there was enough to turn over and slip-stitch in place (see page 25 in the book).  Any problems come back to me and I will do a diagram.

3.         I had found the bottom fiddly when constructing the little box but after chatting to Laurraine she recommended that I stitch the bottom in, opposite sides first.  What this means is that, when stitching bottom in do it in the following order - it is much less fiddly and works well:
                          
4.         Also, I found that the box bottom was neater when I whip stitched lining-to-lining.  This will only make sense once you start to do it.

As for coming to the end of the Zakka trail – I will miss it more than I can say.  I have loved the sew-along; loved the people, the friends, most of the projects, the learning.    Without this Zakka trail I would not have made my first purse, my first mug-rug, my first bag, my first rag ribbon (okay – let’s forget that one!!!), my first fabric box.  And I would not have made my mug rug patterns which are selling like hot-cakes over at Craftsy.     
I must remember that it is the book, Zakka Style, that pushed me on this journey.  A fact that is easy to forget bearing in mind that I would not recommend this book to anybody in its current format.  A beginner would be frustrated and confused – as would a seasoned pro.  It is a disappointing book in that some of the cutting measurements are incorrect, many patterns were not tested at all (obviously) and there is an absence of diagrams throughout the book.  Rashida is compiling a list of errors so that any reprint can be adjusted.  Contact her through this Flickr threadHowever, where the book does stand proud is on the designs – most are innovative, functional and inspiring. Also it has to be said, this sew-along would not have been as good or smoothly run as it was without Lindsey's efforts week after week.  

But, as they say, when one door closes another opens.  I am looking forward to the Handcrafted Holiday Sew and Stitch-along which is due to start next month and I have plenty to do until then.  My block  for the Glorious Autumn Block party  is designed and made ready for 4th October, as is a matching little wall quilt which I will be adding to the pattern shop next week. 

I am hoping our paths will cross on a new trail and we will all continue on our journey together so ..... until next week.

Monday 10 September 2012

Bags, dogs and blocks

We are at the finishing line – it is the last week on the Zakka Sew-along trail.  And what a trial trail is has been. I shall blog later in the week about my reflections on the sew-along and the book!  Right now though I want to share some creations that have crossed my path recently.

Firstly, remember my button bag (and the bruised thumb and dented table)? 
I mentioned that my sister was making a variation on the bag that did not use those darned self-made buttons.  Instead, Lea has appliquéd hearts in a rainbow of colours. 
Her version is stunning – set on  turquoise linen with a pretty flowered lining.  This is something I have learned along the Zakka trail – that improvisation is good – that a pattern is there to be adjusted to suit your needs and tastes. Lea’s bag is a perfect example.  The pattern was easy to follow with plenty of diagrams and I would recommend this book as a gift for yourself or others.

Next, take a look at the Patchsmith’s Scottie Dog Mug Rug pattern.

Susie (Susie’s Sunroom) has added a Christmas background which makes those two lovely little pups look ready for the festive season.
And on the back ....... checks. 
 
What a perfect combination – checks and Scotties just go together so well like ‘scones and cream’, ‘tea and cake’, ‘hives and bees’ and ‘leaves and autumn’.  Which brings me onto the Glorious Autumn block.
 
It was the first week in the Glorious Autumn Block Party.  Three designers set out their autumn blocks.  I was hoping for a patched block but the first three designs all use applique.  I really enjoy quick-fuse applique and the patterns lend themselves to this method really easily.  I decided to undertake the very first block, Pat Sloan’s ‘Pop-a-Licious’ flower block.  For me Pat’s block needed an injection of the red and checks that I love.  So I fused reds and mustards onto an autumn leaf background square.  I think you will agree – it is very in keeping with The Patchsmith’s style and looks good.    I have added it to the Glorious Autumn Flickr group.

(Talking of which, I have set up Patchsmith Patterns Flickr Group - you can see Susie's mug rug, Amy's mug rug and my patterns so far.  But I am looking forward to seeing more interpretations of my patterns.  As all patterns are really affordable there is little to lose - start with making your own Patchsmith Pattern - play with it - have fun - and then post to the group.)

This is all good preparation for October 4th when I shall be sharing my Glorious Autumn block with the UNIVERSE – “Flash ah-ha saviour of the universe – dum-dum, dum, de-dum”.  Sorry, I digress or should that be regress?   Back on topic.  I am also going to host a give-away on that day which will include fabric and patterns so put it on your Zakka Messenger Board.

But enough for now, I need to get on and make a medium sized quilted box for the very last excursion into the Zakka Style Sew Along. 

Friday 7 September 2012

Monday moves to Friday - it's on the Zakka Peg Board

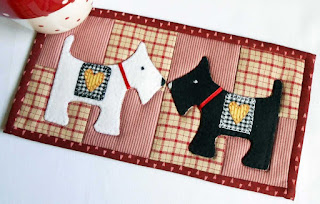
Okay, the family were a little confused this week.  They thought I was Zakkaing on Monday morning when, in fact I was sewing a super-dooper wall quilt pattern to go with my Glorious Autumn block on 4th October 2012. 

So when Friday morning arrived and the family thought we were going shopping I had to tell them that we would go straight after my Zakka project was complete.  They sighed and muttered something about “past Zakka projects taking hours” and “we can expect to go shopping about tea-time”.  Well colour-me-red (of course) they were so surprised when I was all set to go shopping just an hour later, Zakka project complete and on the kitchen wall.  Yes ‘tis true – just one hour!!!  I promised the family that all future changes to the routine would be securely pegged on the new Zakka Peg line.  Oooh, look ..... there’s a message there already. 
This project is really fast and visually stunning.   It was designed by Katrien of abitofpillipilli (I love her bird blog header – it would make a super quilt block) and this week is being hosted by MaureenCracknell.   I did made a few changes (come on, admit it, you knew I would!!!) but they were very small and only added to the simplicity of the pattern.

Firstly I used just one colour for my bunting – it had to be red.  Red is the ascent around my home which I will show you in a couple of weeks when I blog about The Patchsmith at Home.  But for now you will just have to take my word for it – or look through my previous Zakka makes and see all the red!

Secondly, I used fusible webbing for those pesky little triangles because they wouldn’t stay perfectly still.  I fused them in place and this made stitching them down really easy – and very quick.

Thirdly I stitched the twine down at the sides so that when I stretched the linen to fit the frame it wouldn’t slip out.

I only had an 8” frame so there are not so many flags – but I think it still looks good.  One small criticism – a template of the flag would’ve been easy to include in the book.  I made one out of card.

Ooooh look here is another message ..... a sew-along at SewMuch2Luv to replace the Zakka one when it ends.
I wasn’t overly keen to do this project for some reason but I am so glad I did.  It is a really lovely little make.  So quick and a perfect gift for a sewing friend – not that I’m giving mine away – oh no, you lot can make your own!!  And when you do you will find that the most time consuming part of this project is picking the fabrics for the flags.

Look out for further messages on my Zakka peg board in future blogs.  Until next time ....