 |
| Granny's Garden Block 1 |
Lori Holt kicked off The Granny’s Garden SAL with blocks 1 to 4 last week whilst I was on holiday. Thankfully I only need one block from this set of four for my Granny’s Garden bedrunner.
Block
1 is a very pretty flower block but first here is a tip to help reduce fusible webbing costs.
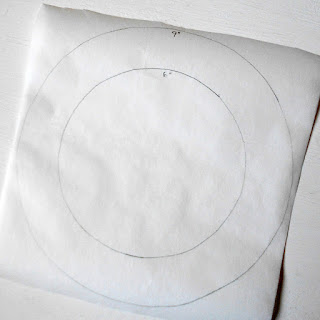
Trace a 9” circle onto the paper-side of the fusible webbing and then trace a 6” circle centrally inside.
(Don't worry if your inner circle
is not centered exactly – it is not important).
 |
| Saving on fusible webbing for the white/cream circles |
Make a slit in the centre of the tracing and cut out the 6” circle. DO
NOT throw the middle circle away – you can use this for the flower petal tracings.
 |
| Cut-out and keep the middle. |
It is then a case of simply fusing the 9” donut onto the WRONG side of your chosen
cream/white fabric before cutting out around the outer 9” traced line. Peel back the paper and position centrally onto the background square. Fuse and stitch in place.
 |
| A fusible webbing donut! |
I fused a lightweight fusible interfacing to the back of Kona Snow to reduce any show through but this is not essential (once the applique has been applied you will not notice the background showing through).
 |
| The background may show through at this stage but it won't be noticeable once applique has been applied (see photo at the top of this blog) |
So onto Block 1. The flower for this block is made up of six hearts (Sew Simple Shapes piece I14). You can do as Lori and I have done and
applique the hearts individually.
However, if you are hand-sewing you may wish to cut down the amount of
sewing - in which case you can trace, fuse and applique the hearts as one big
flower head as shown below.
 |
| One big bloom still requires six petals but you only cut out the outer edge. |
Either way use the 6" fusible webbing off-cut left over when you cut out the centre of the traced 9" circle mentioned above.
 |
| Six petals or one big bloom - the choice is yours. |
As
for the stems – I
traced several ¼” rectangles – each approximately 7” long, onto a piece of
fusible webbing and fused it to the WRONG side of a piece of green Kona
fabric . This way, I can cut a stem as
and when I need it.
 |
| Each stem is ¼” wide and 7" long. |
Once
all the pieces have been fused and cut place them onto the circle. Position the leaves so that they lie slightly
under the stem. I also left a gap in the
petals for the stem but this is your quilt – you decide what is pleasing to your
eye.
 |
| Block 1 - fused and ready for stitching |
When
happy with the placement fuse and stitch in place.
 |
| Blooms in Granny's Garden |
And
there we have it – Block 1 of the Granny’s Garden Bedrunner done. Lori is releasing the tutorial for week 2 of the Granny's Garden SAL today which covers blocks 5 to 8. I shall be needing just Block 5 so be sure to
come back on Wednesday to see how beautiful Block 5 looks using quick fuse
applique.

No comments:
Post a Comment