Sunday, 27 April 2014

The Colour of your Sewing Machine

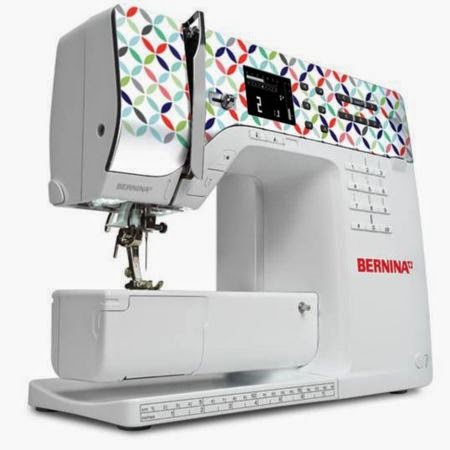
Did you see Camille Roskelley’s sewing machine design?  Camille was asked to design the casing for a Bernina sewing machine. 

http://www.pinterest.com/pin/18436679698990020/

This got me thinking – what would my machine look like? 
http://www.craftsy.com/pattern/quilting/home-decor/sewing-machine-mug-rug/94623
Sewing Machine Mug Rug Pattern
Red and gingham of course!   What about you?

Friday, 18 April 2014

Mug Rug Starter Fabric

Before I show the Wishes block for April I just wanted to share this wonderful layer cake that arrived from the Fat Quarter shop recently.

http://www.fatquartershop.com/butter-pecan-10-squares
Butter Pecan 10" layer cake
It is called Butter Pecan by Whistler Studios for Windham Fabrics.  As soon as I saw it I knew it was the perfect starter pack for new mug rug makers.  Every single block is 10” which is ideal for a mug rug with some left over for scraps and applique.  The colours vary from pale lemon through to darker taupe but each and every fabric will work well as background fabric for any mug rug.

I also ordered some charm packs at the same time - these are a great way of increasing your fabric stash without spending too much money.  Some of the most versatile are the Kona ‘cotton solids’ from Moda.  I particularly like the Sunrise selection for spring:

http://www.fatquartershop.com/sunrise-kona-cotton-solids-charm-pack
Kona Solids 'Sunrise' Charm Pack
Whilst the Neutrals pack comes in handy for owls, goats and hedgehogs:

http://www.fatquartershop.com/new-neutral-kona-cotton-solids-charm-pack
Kona 'Neutrals' Charm Pack

But enough of fabric (can you ever have enough of fabric?) and onto block four of the Wishes Quilt Along.  This block is called “Broken Dishes” and it was a lovely easy make.  I cut my squares 4½” to make the half-square triangles (slightly larger than the pattern stated) and then trimmed them to size.  I used a scant ¼” seam and the finished block is a generous 14½”.

https://www.flickr.com/photos/79143602@N04/13922870644/
Wishes 'Broken Dishes' Block
I am loving this sew-along – it is so quick and easy.  And the blocks are huge.  One block a month is the perfect timescale for me – relaxed enough to be enjoyable yet productive enough that I will have enough for a quilt in a year.

Oooh-er ..... I am beginning to sound like an advert for the Fat Quarter shop as the Wishes sew-along is also organised by them.  But rest assured - I am not affiliated to them in any way - I just love their products.

Sew until Monday when I hope to have the next two blocks completed for the Patchiqué quilt ......

Sunday, 6 April 2014

Patchiqué Blocks 12 and 90

https://www.flickr.com/groups/2445878@N22/
Patchique Flickr Group
This week has seen a lot of sewing on the Patchiqué trail.  Looking at the blocks you might think the patched block, Block 12 was a lot of work – but you’d be wrong.
http://www.amazon.co.uk/gp/product/1568363788/ref=as_li_qf_sp_asin_tl?ie=UTF8&camp=1634&creative=6738&creativeASIN=1568363788&linkCode=as2&tag=manionehundth-21
Block 12 from Japanese Taupe Quilts
Block 12, ‘Atsuita koshi’ (translated as “Noh robe check”) is made up of 61 pieces but I found a quick and easy way to make this block.  Firstly I cut 20” x 1½” strips from each of my two chosen fabrics and stitched them together along the 20” length.  I then sliced these strips into 1½” sections as shown. 
From here it was a simple case of stitching the pairs together. 
https://www.flickr.com/photos/79143602@N04/13675818585/in/photostream/
Patchiqué Block 12- Patchsmith Style
For the darker grid borders I used a scant ¼” seam and I’m glad I did.  My block measures a perfect 9½”.    

So if it wasn’t the patchwork block that was a lot of sewing that can only mean one thing – it was Block 90 ‘Yayuki’ ("snow arrow").  This block looks quite simple but it involves a lot of pieces. 
Block 90 from Japanese Taupe Quilts
All those leaves – thirty six of them!    In fact there were too many and I left off the twelve smallest leaves.  I like the way the largest of the leaves are set at right angles to the stem.  However, the other leaves have to point upwards or they will not fit.

If I were to make this block again I would fuse  and stitch the stems and leaves into position before adding the heart flowers.  This would save having to start and stop for each pair of leaves - something I found very tiresome. Hindsight is a wonderful thing.  
https://www.flickr.com/photos/79143602@N04/13675818585/in/photostream/
Patchiqué Block 12- Patchsmith Style

I would also recommend you pick one colour thread that will suit all your leaves and stem – this will save you having to change the bobbin for each section.   

Even though this block was a lot of stitching, I absolutely love it - it reminds me of a folk art panel. 

So there you have it, another day on the Patchiqué journey.  Be sure to come back in a fortnight when I shall be tackling Blocks 30 and Block 85.