Monday, 7 January 2013

Paws for Thought

Country Cat Mug Rug Pattern

Have you ever wondered where ideas come from? We are all made up of the same molecules and atoms yet we regard our thoughts as uniquely ours.  However, how often have you thought of something only to find that somebody else has thought of it too almost at the same time?  Yes – me also. 

Patchwork Cow Mug Rug (includes block patterns)

For instance, when I made my Pumpkin Patch mug rug I thought it would be a good pattern to redesign slightly to make into an apples patchwork square ..... and low-and-behold Bee-in-my-Bonnet came up with a row of apples in her recent sew-a-row-quilt (and she did it so much better than I could’ve done with apple cores included).  
Sew-a-Row Apples courtesy of Bee In my Bonnet

It is often through several of us having similar ideas that a trend starts.  And it is one of the things I love about the quilting community - we share ideas, knowledge, hints and tips.  It has always been that way with stitchers and quilters - it is woven into the heritage of quilting.  One of the lovely things about the Across the Pond Sew-Along is the way we are sharing sources of free patterns and making them up together.  It is the modern version of the traditional quilting bee.  Why not jump aboard - there is no commitment.  Check out the latest project made by the members at the Flickr group here - you will also find a chat thread for this month's project.
 
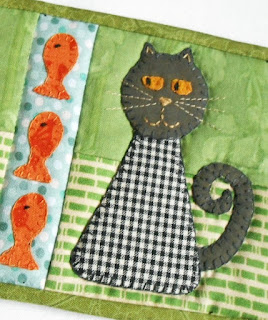
Talking of ideas, sometimes I find they just present themselves to me as I am going about my daily routine, as in the Cats mug rug ...........
City version of my Cats mug rug from 
The Patchsmith's Animal & Pets mug rug pattern book.

There are two black-and-white cats in my neighbourhood – one old and cunning (he lives next door) and the other young and speedy (he lives over the back fence).   A couple of weeks ago as I approached the river on my daily walk, I saw the older cat had caught a mouse which was lying motionless on the grassy bank beside the cat.   The younger cat had obviously spied this and thought now would be a good time to challenge the older cat, especially with such a tasty reward if he pulled it off.   Backs arched, hissing and wailing ensued and the old cat fluffed up his body making him appear twice his normal size.  It was a dreadful din - enough to rouse the little field mouse who must have just been stunned, for he too scurried away into the undergrowth.   I have to say, the older cat didn’t seem very bothered at losing his treat – either that or he was just too old and tired to chase after it, for he lay down on the grass in the winter sun as I walked on by. 
Some cats like mice and some like fish!

And from all this commotion the cat design for my Animal & Pets mug rug pattern book was born.  It comes with two options - you can choose cats who like mice or cats who like fish.   Of course you could include a river with fish and then put mice on either side of the river and then the two cats – but then we are talking more a storyboard than a mug rug!  But hey, if that idea grabs you – then go for it.  (The pattern book is also available in paperback from Amazon.)
Until next time - and, in the meantime, if somebody creates something that you had an idea to do why not let them know what a great idea it was and how well it turned out - after all, if you shared the thought then why not share the praise.

Wednesday, 2 January 2013

Next in the Pecking Order .....

I completed the red bird as mentioned in my previous posting.  This time I constructed the beak from a separate unit and attached it pretty much as you would a hanging loop.
I constructed a brown triangle of fabric approximately 3/4" long and 3/4" wide.  I positioned this brown beak on the RIGHT side of one of the main sections making sure the beak was facing inward.  The beak was stitched in place when joining the two main sections together. 

I like this look and it was so much easier than my first method.  However, check out Susie's blog as she paper-pieced her yellow beak in place and it looks perfect.  Of course the pair of us are just being pedantic as this bird would look gorgeous if the beak was in the same fabric as the main body - exactly as the pattern states. 

I can't wait to see how your bird has turned out so please post to the Flickr group once it is finished.

Until next time ......

Tuesday, 1 January 2013

Tweet Start to 2013

Happy New Year everybody and I hope 2013 brings you everything you wish for or more-of-the-same if you are quite happy and content with your lot.
Here at Patchsmith Palace there are feathers flying!  All those of you who took the first PalaceTour will remember Henrietta, the faithful guard-bird.  Well today saw the introduction of another feathered friend at the Palace and Henrietta is a little jealous.  It is the January Across-the-Pond sew-along project chosen by Susie.  Susie very skillfully (she is a canny girl on the computer) found a wonderful FREE pattern for a bird pincushion/sachet created by Joel Dewberry and decreed that this is the first 2013 outing for the sew-along group.
I don’t know about you but there is always room for a pin cushion (or two, or three ..... okay maybe a few more than that).  I was lucky enough to get some new heart pins for Christmas and they are desperate for a home.  I was also craving some down-time after the hustle-and-bustle of the last few weeks so I set out to complete the January project on the first day of the month.  And it is done. 
 
Here are my hints and tips for this project – for all those swimming in the sew-along pond .....

1.         The pattern states that you will need 20” x 20” of the main fabric – this is far too much – in reality you will need 20” x 8” (or two 10” x 8” pieces).  So fear not – no more than a fat quarter.
2.         Step 2b and 2c instructs you to sew along the line marked on the wing. I couldn’t see a line on the template.  If you look at the photo at the top of the pattern it is clear to see that you need to embroider in a gentle curve along the wing.  So I suggest you wing it (excuse the pun!).  Talking of winging it - that is the name of the fabric I used for the body and belly of the blue bird - 'Wingin It' by Buggy Barn.
3.         Step 4a and 4b.  When pinning the body to the belly use lots of pins. 
4.         Step 5c.          You stitch one side of the body to the belly and then the pattern suggests you stitch the rest of the belly to the bird at the same time as stitching the whole thing together (leaving a 2” gap for turning).  I would advise that you stitch the second side to the belly for a couple of inches, from the tail to the bottom of the bird as you did at step 4b.  Stop sewing, break the thread and then pin the rest of the bird together.  This will make it easier for you to pin and stitch the back of the bird where the two tail sides meet.  (This sounds complicated but when you get to step 5c just pin the other side to the belly and stitch for a couple of inches from tail towards front.)   
5.         Finally, I added the wings after I had put the body together (but before I padded the body) for fear that I might catch them in the stitching. This worked really well and I was able to position them exactly where I wanted them.
6.         I tried to be clever and make the beak a different colour by stitching a scrap of yellow fabric onto the main bird piece before sewing the bird together. This was virtually impossible to turn through and although I did manage it, I wouldn’t do it again.  
I did however, add a very thin bit of wadding to the wing which gave it a more substantial feel. 

My reflections on this project – I LOVE IT.  I love this little bird as a pin cushion or just as an ornament.  I included a hanging loop on the blue bird but I think it is slightly too big to hang so I left it off the next bird I made.  This is a really versatile project and would make a lovely gift.
I also think that the wing would make an excellent needle case which you could attach to the body with Velcro – now wouldn’t that be tweet? (Sorry, but it had to be done.)  Another good use would be to fill a bag with rice and add it to the bottom of the bird before stitching the body closed so that this could be used as a paperweight. 

Sew why not join the Across the Pond Sew Along group this month with this wonderful project.  If you do then don't forget to post your finished birdies to the Flickr group and why not leave your reflections on this project in the January 2013 thread there or as a comment below.