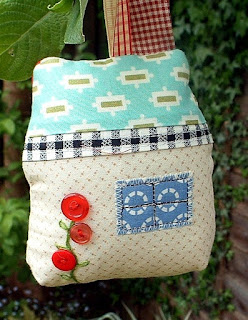
This turquoise house hangs on my wardrobe
door (when it isn’t hiding amongst the trees) and it is a joy to look at. It is simple yet elegant and contains three
of my favourite fabrics – black/white check, red gingham and Bonnie &
Camille's Vintage Modern on the roof.
The free pattern and excellent tutorial can be found on
Retro Mama’s website. There you will see
houses adorned with rick-rack and pom-pom trim, with birds and door
numbers.
 |
| Retro Mama's Neighbourhood of House Ornaments |
However, when I made my
turquoise house I didn’t even have ribbon to hand so, in the make-do-and-mend
spirit of a quilter, I used a strip of black-and-white check fabric in its place. I added a window and some button flowers to
the back and left the bird off the front.
I love
the simplicity of my version though Retro Mama’s houses are truly awesome. But whilst I love my turquoise house and have chosen
it as this month’s project, I couldn’t help but tweak it
slightly to create a purpose for this wonderful little ornament. So may I present ....... {drum roll} ......... the
Tooth Fairy’s House.
I know what you are thinking - it looks identical to the turquoise house but with different fabrics. Ahh, to see the real difference we need to nip round the back.
Still can't see the difference? Perhaps this will help .....
I have adapted Retro-Mama’s pattern slightly
to add a pocket to the back so that children can put their tooth in the
pocket and hang it on their bedroom door or bedpost. The tooth fairy no longer has to creep
about, searching under pillows and sleepy heads, for that pesky little molar. Instead she can extract
the tooth (excuse the pun) and pop a coin in the pocket ready for when the
child wakes up. Cool eh?
And as every household should have at least one Tooth
Fairy House I guess I better tell you how easy it is to add this extension to the Retro Mama house .......
Firstly cut out the house pieces as per Retro Mama’s
tutorial (step 1) and cut an extra rectangle of ‘house’ fabric that
is as wide as the house template and 5½” deep.
Fold it in half, wrong sides
together and press.
 |
| Add any embroidery if desired, before pinning to back of house |
When you cut the corners out of the bottom of the house pieces (step 2), repeat the process on the bottom (raw edges) of the folded rectangle. This rectangle forms the pocket and should be pinned to
the right side of the bottom of the
house back so that the raw edges match the bottom of the
house. (The house back is the non-interfaced house piece.) |
| Pocket lies on top of house back |
Whether you add a pocket or not this is a quick and easy
project that will take little more than an hour.
So why not jump on-board for this month’s Across the Pond sew-along. There is a Flickr group and discussion thread
for any questions or tips – I will check in regularly throughout the month. And we’re a nosey lot on-board this SAL so
please post a photo of your finished project in the Flickr group so we can check out your
neighbourhood.
Sew until next time ......


I love those houses. I alredy made those and I have some ready to be stitched on my table! Love your button flower and pocket addition as well. Thumb up for houses! :-)
ReplyDeleteCan't wait to take a tour around your neighborhood ;-)
DeleteA.Dor.A.Ble. I LOVE them both! The remark about extracting the tooth is too funny. :) There is just something about these little houses that makes me smile...must make some soon!!!
ReplyDeleteGreat idea to add a tooth fairy pocket.
ReplyDeleteGorgeous creations.
Perfectly sweet project!!
ReplyDeleteI love it! I can see it as a pincushion cottage or Christmas cottages on a little tree for the holidays.
Yours are sooooo cute, Amanda! I love that button flower.
I can't wait to make my first little house!
Susie
How cute that is! I am loving reading your blog from here in North Dakota....USA.
ReplyDeleteI hope the weather is good there and you are having fun. It is lovely to have you aboard.
Deletexxx
I think I saw these in Amy made that! I make them pillow style although mine are small but your houses are much more inviting!!
ReplyDelete