Thursday, 8 September 2022

Scrappy September - Free 6" Paper-Pieced String Block Template

A quick and easy Autumn table runner

The Fat Quarter Shop is hosting a Scrappy September giveaway with free scrap happy block patterns and the chance to win a Fat Quarter Shop token.  So I thought I would join in.

I like to make small projects so I am using my scraps to make an autumnal table runner for my coffee table.  And here is how I did it.

A large scrappy pumpkin block

Firstly, you will need two 12" (finished size) pumpkin blocks of your choosing.  I chose to enlarge the 6" Orange Pumpkin block from my Sampler Quilt Block pattern book - if you want to resize the block from my book you will need to cut the block pieces as follows:

Piece A:         2½” x 10½” rectangles
Piece B:         2” x 2½” rectangle
Piece C:         2½” squares
Piece D:         3¾” x 2½”  rectangles
Piece E:         2½” squares
Piece F:         2” squares  

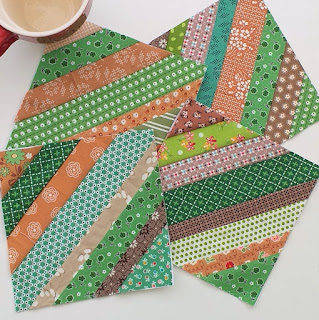
You will also need six 6" String Blocks (finished size). 
I have creased a FREE Paper-Pieced String Block Template which you can download by clicking on the image below.  Just print it onto ordinary printer paper or trace it onto baking parchment.  There are lots of tutorials and videos online showing how to paper-piece if you are new to this method.

The Patchsmith's 6" String Block Template

I  decided to keep my colour palette to autumnal greens and browns for this project.

You will need six string blocks for the runner

Then it was a simple case of putting the blocks together starting with stitching four of the string blocks together to create one large 12½" central string block.  You don't need to match seams but you can if you want.

One large block of scrappy strings

To make the side sections of the runner I stitched the two remaining 6" string blocks together to create one string rectangle measuring 6½ x 12½". 


Which I then cut in half lengthwise to create two 3¼” x 12½" rectangles.


Next I flipped one of the rectangles so the sidebars were a mirror image of each other.  

The finished table runner top measures 42" x 12½" and is all ready for quilting and binding. .

I love bringing the seasons into my home.

Even if you don't want to make a runner, it is worth putting together some scrappy blocks and posting them on Instagram with the hashtag #FQSScrappySeptember for a chance to win one of three $25 FQS tokens.  

And of course, tag me #thepatchsmith so I can see all your lovely scrapilicious blocks too.  Until next time .......

Tuesday, 2 August 2022

Whales and Flying Geese


Sometimes it just takes a little addition to turn a mug rug into a slightly bigger mini quilt.  Here I have  added a rainbow of flying geese to the Whales mug rug pattern from my Animal and Pets pattern book.

The Whales Mug Rug pattern is also available from Etsy.

But these aren't just any flying geese - these are 3D Flying Geese which are super easy and super quick to make.

A rainbow of flying geese.

The 3D flying geese block requires only one seam and because of this, it is really easy to match up the geese without sewing off the point.  There is a very good You Tube tutorial  
showing how to make them but here is a basic run-through of the process for those who prefer a paper copy (click HERE for a PDF print out): 

(makes one goose measuring 2½” x 1½” raw/2” x 1” sewn in)

Cut one goose rectangle measuring 2½” x 1½”.
Cut two background squares measuring 1½”. 
 
Fold the goose rectangle in half with wrong sides together.  Finger press (do not press with an iron). 

You will now layer the goose between the two background squares as follows:

Lay one background square right side facing up.  Lay the folded goose rectangle on top with the raw edges lined up with the top of the background square as shown. 

Note the folded goose block is slightly shorter than the background square so you should have ¼” excess background square showing at the bottom. 
Next place the other background square on top of the goose, right side facing down so that it overlaps the bottom background square completely. 
In effect, you have a goose sandwich!

You stitch the unit together down one side of the sandwich as shown. 
Open up the sandwich so that the goose lies evenly on the front of the two background squares and press. 
Hey presto – one flying goose (measuring 2½” x 1½”). 

You can batch make a whole gaggle of flying geese using this method and when you come to stitch them together you will be able to see clearly where the tip of the goose is so there is no risk of losing your points!

So there you have it.  You can make the geese any size you like – fat, thin, long, short.  Play around and have fun.  But here are some measurements to get you started:
 
Finished
Goose            Cutting Sizes

2” x 1”             Cut one 2½” x 1½” goose and two 1½” background squares

4” x 2”             Cut one 4½” x 2½” goose and two 2½” background squares

5” x 2½”          Cut one 5½” x 3” goose and two 3” background squares 

6” x 3”             Cut one 6½” x 3½” goose and two 3½” background squares
 

Try it out and turn a little bit of fabric fun into a row of your own flying geese.  Or do as I have done and  add a row to any mug rug pattern of your choosing.  

Until next time .....

Monday, 13 June 2022

Farmhouse Stars in Circles in Squares

Stars in Circles

This week in the Farmhouse Star Quilt SAL we start to applique the stars to circles and the circles to squares - and I am so glad I am using the quick fuse applique method.

Using Lori’s interfacing method you will sew each star/circle twice (once to the interfacing and the second time affixing it to the background).  With 55 stars and 15 circles - that's a lot of sewing.   However, with quick fuse applique you only need to sew once – half the sewing and a whole lot quicker.

The Pattern is available from The Fat Quarter Shop

Firstly, I replaced the recommended Lori Holt circular rulers with items from my kitchen saving myself quite a few pennies.  

No need for circular ruler - just scurry through your kitchen cupboards

And whilst we are talking circles – I would recommend you cut the circles ½” bigger than stated in the pattern, so that you can fit the stars into them (the circles will still fit onto the background squares).  Otherwise you will struggle to get the stars to fit neatly into the circle.  


You can trace and cut three circles in one by tracing the largest circle first (in this case 12½”) then trace a middling (10½”) circle inside it and finally trace a smaller (8½”) circle inside that as shown:

I cut all three circles ½" larger than the pattern stated

Then cut out each circle roughly (not along the traced lines) so that the circles became rings of fusible webbing, each measuring approximately 1” wide.  You will be left with a large inner circle of fusible webbing that can be used for some of the points/pentagons.

Circles become rings with a little extra in the middle

Then it is a simple case of fusing the rings to the back of your chosen fabrics .....

Three rings ready to morph into three circles

...... before cutting out each circle accurately along the traced line.

Ready for a star turn!

If following the pattern repeat this process four more times.  However, you will still need to cut two further 12½” circles but you can do so by creating a single ring of fusible webbing.  That way you can use the middle cut outs for the points and pentagons.  

A single large ring.

Next fuse the circles onto the background squares .  

A circle in a square - but where is the star?

And from thereon in it is a case of tracing and fusing the 
the stars and pentagons as detailed in the first post of this sew-along.  

Easy quick fused stars

Just remember to keep the backing paper on the pentagon until you have positioned points into place.  When I lift the paper-backed pentagon off it looks like this: 

It is looking a little messy right now ....

But all that untidiness is hidden again after I have fused the pentagon on top.

A star in a circle in a square - perfection!

Now I just need to stitch all those stars to the circles and the circles to the squares.  Until next time .....

Talking of fusible webbing – I use Bondaweb which I buy in a 30m roll via Amazon as I use a lot of it.  It is quite expensive initially but I save in the long run.  The roll I am currently using I purchased in 2017 and I still have lots left.  If you are making the quilt as detailed in the pattern I estimate you will need approximately 6m of 45cm wide fusible webbing.