Friday, 6 December 2013

Quilty Fun Sew-Along - Baskets of Geese

http://fatquartershop.blogspot.co.uk/p/quilty-fun-sew-along-and-blog-tour.html
To date the Quilty Fun sew-along (based on the book of the same name by Lori Holt) has been the perfect pre-Christmas sew-along with a quick and easy project each week.  The projects to date have been suitable for beginner and experienced quilters alike. 
http://www.flickr.com/photos/79143602@N04/10886191796/in/photostream
Week 1 and 2 - Apples and Stars
However, not so week 5 where we are faced with the ominous task of making thirty-one 2½” x 1½” flying geese blocks.  These are teeny-tiny blocks and they need to be to exact size because they are going to fit into the finished project in three different places.  The method Lori uses in her book to make the geese is a method I first came across many years ago in a book called “Sew A Row Quilts” by Karen Hellaby. 
http://www.amazon.co.uk/gp/product/0954092805/ref=as_li_qf_sp_asin_tl?ie=UTF8&camp=1634&creative=6738&creativeASIN=0954092805&linkCode=as2&tag=manionehundth-21
I didn’t like it then but that was a long time ago and to date, I have liked Lori's techniques.  So I decided to give the method another try.  After making twelve geese I was disappointed to find only half finished to the correct size.  I know some people love this method but I'm not one of them!  (Tip:  Be careful when using pencil markings as the pencil can come off onto the iron and transfer onto your fabric.)
http://www.flickr.com/photos/79143602@N04/11036101506/in/photostream
Week 3 - Courthouse Steps
These geese were 'getting-my-goose' so I reverted back to my preferred method for making little geese blocks - the 3D flying geese method (tutorial here).  I love this method – it is quick (only one straight seam per goose) and I like that I can see where the goose point is when I stitch the units together. One hour later and my geese units are all stitched and finish at the correct size.  You need to make three units – one with six geese (6½” x 2½”), one with twelve geese (12½” x 2½”)and one with thirteen geese (13½” x 2½”).
http://www.flickr.com/photos/79143602@N04/11238400993/in/photostream
Week 4 and 5 - Baskets and Geese
But that is the fun of a sew-along – everybody has a favourite way of working and we pool our knowledge and share our tips to get the job done - one way or another.  And as somebody recently posted in the Quilty Fun Flickr group - it is such a good way to try different methods and learn something new. 
Not a goose in site ..... or is there?
If you really can’t get the hang of the tiddly flying geese blocks you can always cut 2½” x 1½” rectangles and use those in the finished project – it will still look good.  In fact, you may not even notice that your geese have flown!

Sew until Sunday when I will be posting another two Patchiqué blocks ......    

Saturday, 30 November 2013

Across the Pond Christmas Project and Give-away

http://www.flickr.com/photos/79143602@N04/11139291126/in/photostream/lightbox/
I love December – it is a month of joy and gifts and chocolates on the tree.  It is also time for another Across the Pond project but the last thing any of us need in December is a HUGE project.  So I have the perfect, one-hour make for you this month (okay, some may take one-and-a-half-hours but hey – what’s 30 minutes between friends?)

My choice of project this month is the cup cosy or ‘mug hug’ as I like to call them.  There are plenty around but two of my faves are:

Sew Happy Geek – this is the simplest and most versatile.
http://sewhappygeek.co.uk/index.php/2011/05/24/tutorial-tuesday-coffee-cup-cosy-with-free-pdf-template/
You can patch it, applique it or use one piece of designer fabric.  Quick, easy and effective.  You could even make a co-ordinating mug hug with left-over fabric from another project (mmmm maybe a Patchsmith mug rug?)  What a great little present that would be for the Secret Santa.
Note:  Ignore the comment about needing an account to download - this is no longer true.

And then there is Staci over at Crafty Staci who has a selection of FREE patterns and tutorials.
http://craftystaci.com/coffee-cup-sleeves/

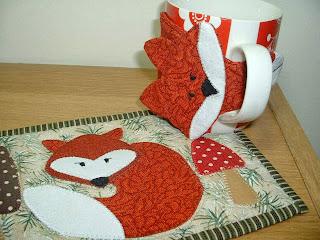
Now these are some seriously cute, fun designs and I chose to make her fox mug hug to match my Fox mug rug and coaster
http://www.flickr.com/photos/79143602@N04/11139254335/in/photostream/lightbox/
This mug hug went together really well - it was a little fiddly turning it right side out but my trusty chop-stick came to the rescue.  It took little more than an hour.
But I'm a greedy girl who wants all the presents on her wish-list.  I also wanted a mug hug for my pen pot.  My pen-pot-mug is quite short so I simply patched eleven 3" x 1½” strips together to give me a finished mug hug measuring 10½” by 2½” tall.  Then I appliqued the little blackbird from my Seasonal Tree mug rug pattern and hey-presto - a cosy country pen-pot.
Blackbird Pen Mug Hug
Then, just as I was about to fill up one of these mugs with a nice cup of Italian coffee, an email popped up to tell me that Amy (of 'Amy Made That' fame) had made a lovely tree skirt from Kate Spain's 'In From the Cold' winter fabrics.  This reminded me of the left-over charm squares from my JOY banner. And before I could say, 'Yes Santa, I have been good ...... at least once this year' - I had made another slightly larger version.  This one is reserved for my Christmas cocoa.
To match Amy's Christmas Tree Skirt
(I just need to figure out a way to get her to send it to me .....
perhaps I could tell her it is needed for a photo shoot!)
But you don’t have to make these cute little cosies just for mugs – what about jars of preserves (jam, marmalade, pickle) - or long, long hugs for bottles of wine.  I am sure you can come up with some other ideas as well.  

Oooh, that has given me an idea – how about a competition?  ‘YAY’ I hear you all screaming.  Just leave a comment telling me how you will use your mug hug.  I will pick a winner, at random, on Christmas Eve to receive a small fat quarter bundle.   (Make sure I can contact you to be in with a chance.)  And everybody who posts a photo of a mug hug onto the Across the Pond Flickr Group will get an extra chance to win.

Sew until next time ....... 

Sunday, 24 November 2013

Patchiqué Week 4 – Blocks 8 and 73

http://www.amazon.co.uk/gp/product/1568363788/ref=as_li_qf_sp_asin_tl?ie=UTF8&camp=1634&creative=6738&creativeASIN=1568363788&linkCode=as2&tag=manionehundth-21
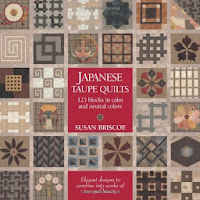
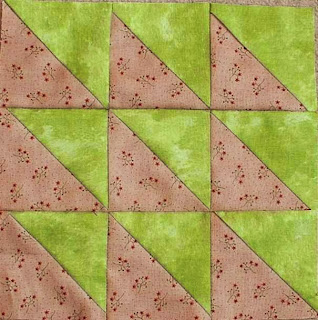
Block 8 in Japanese Taupe Quilts is called ‘Uroko’ which translates to ‘scales’ and you can see why.  It is all points and balance. 
Block 8 from the book
This block is rated ‘simple’ in the book and it is, just so long as you are spot on with your half-square triangle (HST) blocks.  To make sure mine were just right, I cut my initial squares to 4” and made half-square triangles which I then trimmed to 3½”.  The trimming took quite a bit of time but it saved me lots of unpicking when it came to matching up seams.  I also pressed the straight seams (not the diagonal ones) open to reduce bulk.

http://www.flickr.com/photos/79143602@N04/11033927756/in/photostream
Block 8 Patchique Style

I know there is a lot of debate about pressing seams open – I don’t normally do it, but after making the Birds-in-the-Air block recently, I have found it reduces bulk when sewing blocks together.   I am pleased with how this block turned out although it was a little boring to make.

So on to the appliqué book which was Block 73 ‘Yama fubuki’ (mountain snowstorm). 

Block 73 from the book
I didn't know if I would like this block as it has as many points as Block 72 (Klingon warship block).  But I was pleasantly surprised - I think the fabric I chose softens the sharpness of it.  I had two 5” charm squares that I thought would go particularly well but I wasn’t sure if I could cut all six pieces from the charm squares.  So I traced two 5” squares onto the paper side of my fusible webbing and then traced the template into the squares.  Yep, I could get three templates in each square.  This block was easy to do with Bondaweb and turned out well.  Yet again I didn’t use the protractor but ‘eyed’ it. 
http://www.flickr.com/photos/79143602@N04/11033928466/in/photostream
Block 73 Patchique Style


After all the points of the last two blocks I fancy something a little more rounded so my next appliqué block will be Block 110.  This is one of the things I like about this book – you can dip in here and there and do whatever takes your fancy.  Block 110 combines patchwork with appliqué (my speciality) whereby you patch the sections and then appliqué them on.  As for patchwork – Block 10 awaits.

Sew until next time........