

Sometimes
you need a last minute gift but you don’t have much time. And sometimes you just don’t feel like
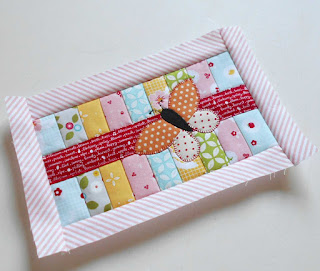
quilting. Don’t worry – I have just the
thing - my Butterfly Patch Mug Rug pattern.
The pattern isn’t designed as a quilt-as-you-go (QAYG) pattern but it
works beautifully. Here’s how ....
1. Cut your strips according to the
pattern but cut them slightly longer. And cut your batting
slightly larger too. (I cut my strips 6" in length and my batting rectangle 12” x 8”.)

2. Lay the first strip on top of the batting - 1” in from the
left-hand side of the batting with at least 1” of batting showing at the top and
the bottom. (Of course you could always
start from the right-hand side if you prefer.)

3. Next lay the second strip on top of the
first. Pin in place and stitch to the
first strip using a ¼” seam down the right-hand side.

4. Finger press open. NOTE:
If you are using synthetic batting do not press with an iron as the
batting will melt onto the iron.

5. Next lay the third strip on top of the
first two, aligning the right-hand side of the strip with the right-hand side
of the first two strips. Pin and stitch
using a ¼” seam down the right-hand side as before. Finger press open.

6. Continue adding all the strips in this
way.

7. Once all the strips have been stitched
onto the batting trim the patched rectangle to the size of the finished mug rug
(you will find this on the front of the pattern). Try to keep the strips straight but don’t
worry too much – the band and butterfly will distract the eye from any
imperfections.

8. Add the center band exactly as detailed
in the Butterfly Patch pattern.

9. Decide which fabrics you are going to
use for the butterfly and applique this onto the mug rug. I couldn’t make up my mind so I made a couple
of butterflies. I went with the orange (I am saving the pink butterfly for another project).

10. Once all applique and stitching has been
completed you are ready to add the backing.
The best way to do this is lay the mug rug onto the backing rectangle
wrong sides together.

11. Pin and stitch ⅛” all around the edge of the mug
rug to secure the backing fabric to the mug rug before trimming the backing to
match the size of the mug rug.

12. Then it is simply a case of binding the
mug rug to finish. I say ‘simply’ but I
find choosing binding one of the hardest steps when mug rug making.
And
there you have it – the perfect gift for Mother’s Day, a birthday or any day of
the year.
The Butterfly Patchmug rug pattern includes a 6” butterfly block template) and is
available for immediate download from my ETSY STORE.
Adorable! Enjoy your posts so much!
ReplyDeleteThank you Connie.
DeleteYou never cease to amaze me with your creativity!! So beautiful!
ReplyDeleteThank you Sheila - I have so much fun and I think that comes across in my designs.
DeleteThis is a wonderful way to try out QAYG! Thanks for sharing the steps!
ReplyDeleteThank you Julie. I find mug rugs the perfect size project for trying new techniques.
DeleteWhat an adorable mug rug! It's a super fun way to welcome spring in !! Your tutorials are awesome!
ReplyDeleteSusie
Thank you Susie. Anything that makes sewing easier and quicker means more time to ...... SEW!
Delete