Showing posts with label free pattern. Show all posts

Sunday, 20 September 2026

Quilted Coin Keyring or Earbud Pouch


Earbud Pouch becomes a Coin Keyring

It still surprises me, in these payment card days, of the number of times when I don't have a few coins to hand when needed - for instance at a parking meter or when I need a shopping trolley which requires a £1 coin to release it.  

Earbud Pouch 

With this in mind I remember a lovely little keyring pouch I made back in September 2013 to hold my earbuds.    

I also remember how quick and easy the little circular pouch was to make due to an excellent free tutorial by Erin Erikson of Dog Under My Desk blog.  Would it still be available after all this time I wondered?  I am very pleased to say it is and you can find it HERE on Erin's blog (or click on the photo below).


All you need to make this hand little pouch are four 5" squares, offcuts of batting and a zip.  One hour later - hey presto - the perfect coin keyring.

Even the lining looks pretty.

So what are you waiting for?  Check out Erin's free tutorials - there is even a little heart-shaped zippered pouch for you to try.

Until next time .....


Thursday, 12 February 2026

The Patchsmith's Super Speedy Glasses Case


Many years ago, in May 2014 I made a couple of glasses cases from a delightful free tutorial by Hillside Quiltworks.  Needless to say the glasses cases are looking tired and worn so I decided to replace them like-for-like.  Unfortunately I was unable to locate Hillside Quiltworks or the tutorial online so I decided to get creative and create my own tutorial based on their very functional design.  And here it is....

1.         You will need two 6" x 7" rectangles of fabric (one for the outer and one for the lining).  You will also need one 5½“ x 6½” rectangle of lightweight batting/wadding.  

2.           Firstly, print the Patchsmith's  Glasses Case pattern piece.  When printing ensure you select 'Actual Size' on the print screen (sometimes referred to as scaling set to 'none' or 'print at 100%').  Use the print-size-check-box on the pattern piece.

3.         Optional:  Add embroidery/applique to the front of the glasses case making sure to position your chosen design on the right side of the outer fabric rectangle, ¾"-1" in from the right-hand edge of the fabric and at least 1½” up from the bottom edge of the fabric.  (I added a heart to my glasses case using the quick-fuse applique method once I had placed the batting to the back of the outer rectangle thus quilting and appliqueing the heart in place at the same time.)

4.         Next pin the wadding centrally onto the wrong side of 6" x 7" outer rectangle.  This should result in you having a ¼” border of fabric all the way around the wadding rectangle.  

5.        Quilt the wadding and outer rectangle as desired.  (I quilted simple straight lines avoiding the appliqued heart.)

6.         Once all quilting is complete, place the template printed side up, onto the right side of the quilted rectangle and cut out along the top edge to create the curved edges.   

7.         Next pin the lining and outer fabric right sides together and trim the lining to match the  outer quilted section.

8.         Mark a 2½" opening centrally along the bottom edge.  Using a ¼” seam allowance stitch all the way around the unit leaving the opening unstitched.  Backstitch at the beginning and end of the opening to ensure the stitching does not come undone when turning right side out.
 
9.         Carefully trim the corners on the diagonal ensuring you do not to cut through the stitching.  Turn the glasses right side out through the opening, taking care when pushing the corners out.  Press firmly and press the opening closed (this will be stitched closed at the same time as top-stitching the glasses case together at Step 11).  Use pins/clips/glue to hold the opening closed.  (If you prefer you can whip stitch the opening closed.)

10.         Fold the glasses case in half, lining sides together as shown.  Pin or clip to secure.  

11.         Finally, starting at the top left-hand back edge top-stitch along the back, down the right-hand side and along the bottom as shown.  The front curve is left unstitched.

And there you have it – the perfect little glasses case to gift or to keep.   I told you it was quick and it gets even quicker the more you make.

Until next time....

Thursday, 8 September 2022

Scrappy September - Free 6" Paper-Pieced String Block Template

A quick and easy Autumn table runner

The Fat Quarter Shop is hosting a Scrappy September giveaway with free scrap happy block patterns and the chance to win a Fat Quarter Shop token.  So I thought I would join in.

I like to make small projects so I am using my scraps to make an autumnal table runner for my coffee table.  And here is how I did it.

A large scrappy pumpkin block

Firstly, you will need two 12" (finished size) pumpkin blocks of your choosing.  I chose to enlarge the 6" Orange Pumpkin block from my Sampler Quilt Block pattern book - if you want to resize the block from my book you will need to cut the block pieces as follows:

Piece A:         2½” x 10½” rectangles
Piece B:         2” x 2½” rectangle
Piece C:         2½” squares
Piece D:         3¾” x 2½”  rectangles
Piece E:         2½” squares
Piece F:         2” squares  

You will also need six 6" String Blocks (finished size). 
I have creased a FREE Paper-Pieced String Block Template which you can download by clicking on the image below.  Just print it onto ordinary printer paper or trace it onto baking parchment.  There are lots of tutorials and videos online showing how to paper-piece if you are new to this method.

The Patchsmith's 6" String Block Template

I  decided to keep my colour palette to autumnal greens and browns for this project.
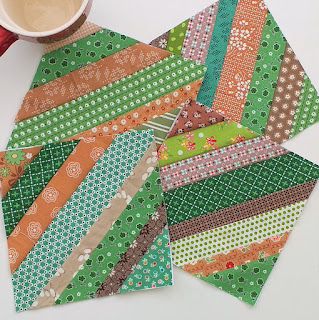
You will need six string blocks for the runner

Then it was a simple case of putting the blocks together starting with stitching four of the string blocks together to create one large 12½" central string block.  You don't need to match seams but you can if you want.

One large block of scrappy strings

To make the side sections of the runner I stitched the two remaining 6" string blocks together to create one string rectangle measuring 6½ x 12½". 


Which I then cut in half lengthwise to create two 3¼” x 12½" rectangles.


Next I flipped one of the rectangles so the sidebars were a mirror image of each other.  

The finished table runner top measures 42" x 12½" and is all ready for quilting and binding. .

I love bringing the seasons into my home.

Even if you don't want to make a runner, it is worth putting together some scrappy blocks and posting them on Instagram with the hashtag #FQSScrappySeptember for a chance to win one of three $25 FQS tokens.  

And of course, tag me #thepatchsmith so I can see all your lovely scrapilicious blocks too.  Until next time .......

Friday, 20 May 2022

The Queen's Platinum Jubilee Mug Rug

Platinum Jubilee Mug Rug

I love to bring the seasons and celebratory days into my home using small quilted items especially mug rugs.  (What is a mug rug?)

Here in England we have a very special celebration coming up - the Queen's Platinum Jubilee celebrating the extraordinary achievement of Queen Elizabeth II to serve the people of Britain for seventy years. 

If time is short, quilt and bind a block to add a touch of British charm.

And I want something particularly special to mark the occasion.  So I have created a Platinum Jubilee mug rug using the 6" Union Jack block from my Union Jack Blocks and Table Runner pattern.  

6" and 12" Union Jack Blocks and a Table Runner
in one handy pattern

If you want to do the same this is how ......

Firstly you will need to patch a 6" Union Jack block.  Alternatively, you could use any 6" block (finished size) that has a British theme.

It doesn't have to be red, white and blue.

Next, you will need to download and print the 

PLATINUM JUBILEE MUG RUG SIDEBAR PATTERN.  

Make sure you print the template sheet to the 'exact size' using the size check box on the template page.  (I also have a page on downloading and printing patterns.)

Add some jewels if you want a pop of colour

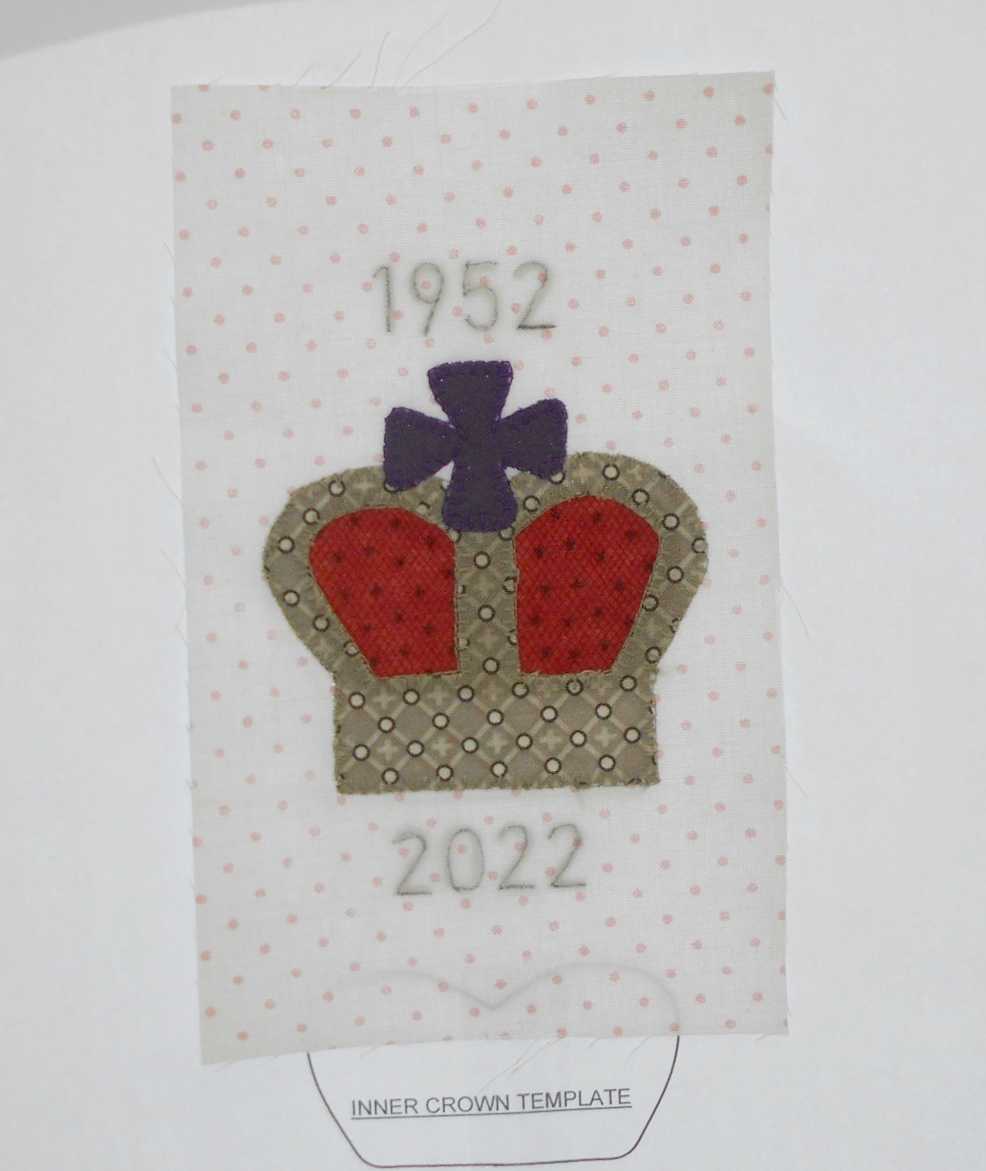
Then follow the pattern to applique the crown onto the sidebar.  You can add jewels to the crown as I have down in the red, white and blue version above - or you can leave the crown unadorned as shown in the pretty pink version below.

No jewels for this crown!

And you could leave it there - finishing off the mug rug as detailed in the Sidebar Pattern.  However, if you wish to make the mug rug commemorative you might want to add the dates to the sidebar.

To do this you will need to mark the dates onto the sidebar.  You can use a lightbox if you have one or you can do as I have done, and use a window and some sticky tape.   Here is how:

Tape the applique template to a window

Once the applique is complete tape the template page to a window before taping the appliqued sidebar on top of the paper, aligning the appliqued crown with the crown on the paper.  (Do not worry if the applique is a little out - you just need to be able to see the dates, so adjust the sidebar position if necessary.)

Tape the appliqued Crown Sidebar on top of the sheet

Next use a dispersible marker pen or pencil to trace over the dates.  I use a Frixion pen as the markings disappear when you iron over them.  These are readily available from supermarkets here in England but you can also purchase them from Amazon.   Alternatively you can use chalk paper.

These Frixion pen marks will disappear with a hot iron

Carefully detach the sidebar from the template sheet and you are ready to stitch over the date tracings.  I used two strands of embroidery floss and a small chain stitch on the red, white and blue mug rug and a simple backstitch on the pretty pink mug rug.

Pretty in Pink

Finally, finish off the mug rug according to the sidebar pattern.

There you have it - a little bit of nostalgia and a whole lot of fabric fun.  Until next time ....

Saturday, 2 December 2017

Quilted Christmas Tree


I cannot believe it is three year since I made a quilted Christmas Tree forest. 
If you fancy making your own quilted tree you will need the FREE QUILTED CHRISTMAS TREE PATTERN 

Click on this photo to go through to the FREE Quilted Tree Pattern

You can find the tutorial and blog post HERE which contains lots of photos to help you grow your very own Quilted Christmas Tree.  
Click on this photo to go through to the tutorial
Until next time ........