Monday, 26 November 2018

Patchsmith Sampler Block 39 - Beehive

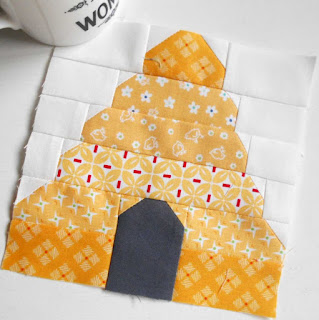
Block 39 - Beehive

Summer may be a distant memory for many at this time of the year but we can add a summer glow through the fabrics we use and the blocks we make.  This week’s block is a good example – the Beehive.

The Beehive block makes good use of yellow fabric scraps as it looks its best when each layer of the hive is made using a different fabric.  

Putting the beehive together is a case of layering the indidividual sections.  And my tip for this week's block - don't worry if your layers do not meet exactly – the block will still look good.  Remember that perfection can sometimes be the thief of joy. 
https://www.pinterest.co.uk/pin/568860996680441283#
Block 39 Beehive is a great scrap buster
I hope you enjoy this block.  I would love to see any you make over on Instagram (#block39beehive) or in the Flickr group.  Until next week .....

Tuesday, 20 November 2018

Patchsmith Sampler Block 38 - Night Owl


Block 38 - Night Owl

After last week’s Elephant block we have a nice easy ‘quick-fuse’ applique block this week – Block 38 ‘Night Owl’.

This block was created based on my Night Owls mug rug pattern.  If you want to turn this block into a fun mug rug just add a 3” x 6½” rectangle of novelty fabric to either side of the block before quilting and binding.   
Night Owls Mug Rug Pattern

Like Block 36 ‘Moonlit Star’ you have the option of having the moon facing to the East or to the West.  The only tip I have for you is to place the moon so that there at least ¼" between the moon and the edge of the block to allow for seam allowance.

And remember - owls can come in a multitude of colours ....

Next week we are back to patchwork for a scrapilicious beehive.  
Block 39 - Beehive
Until then......

Friday, 16 November 2018

Farmers Wife 1920s Blocks 21, 22, 23 and 24

Block 21 – Contrary Wife
Block 21 - Contrary Wife
My notes state that "There is nothing contrary here.  Very pretty, very easy block to patch."  I cut the squares for the half-square triangles to 3½"and trimmed them down to 2½" once I had made them.  

Block 22 – Corn and Beans
Block 22 - Corn and Beans
Although my block is more carrots and pumpkins! I paper-pieced this block by constructed the center square (which is on-point) before adding four identical corner units. My journal entry states "only just to size - enjoyed making it though." 

Block 23 – Country Farm
Block 23 - Country Farm
I paper-pieced this block and it "went together beautifully." It reminds me of a summer picnic.

Block 24 – Country Path
Block 24 - Country Path
I limited the number of fabrics I used on the center square unit of this block to give it more balance. Like block 22, I created the center square (which is on point) and added four corner units.

I have sashed and stitched two rows of ten blocks together so I think that is quite enough for now.  But be sure to come back soon to check on my progress.  If you want to see all the blocks I've made so far you can find them on my Farmer's Wife 1920s Pinterest Board. 

Sunday, 11 November 2018

Patchsmith Sampler Block 37 - Elephant

Block 37 - Elephant

This week we are tackling the hardest block in the book so I have lots of photos to help you.  But before I do please note the following two small amendments: 

Step 14 – you should make a diagonal mark on the (S) background rectangle 1” in from the top right-hand corner down to the bottom right-hand corner as shown in the diagram; and

Step 16 – you should add the (R) background rectangle to the right-hand side of the unit created at step 15 – again as shown in the diagram.  
If in doubt follow the diagrams as they are correct.

So let us begin.......

Step 1 is simply to mark the back of our squares for the quick corner triangles.  Steps 2, 3 and 4 is where the stitching begins as we create background quick corner triangles onto the A, B and C elephant pieces. 

We also stitch a background rectangle to the right side of the C/O unit.  (If you are ever unsure about what pieces go where just look at the diagram at the start of the pattern – it shows all the pieces.)

We continue with quick corner triangles for steps 5 and 6 as we begin to make the trunk unit.

After step 7 you should be able to see the curve in the trunk. 

Steps 8 and 9 complete the trunk with addition of a simple three-square-unit created at step 8.

At step 10 we join the trunk to the bottom head unit created at step 3.

Next we complete the head by adding the unit created at step 4 to the top of the trunk unit.  This unit should now measure 3” x 4”.  (Did you know all Patchsmith measurements are given in the format width x height?)

At step 12 we resume our quick corner triangles to start on the elephant’s ear.  Remember this is your elephant – he can have whatever colour/pattern ear you want. 

Once the ear section is made we are ready to join all three units together at step 13 to create the body of the elephant.   

Next we create the top of the ear by marking the (S) background rectangle 1” in from the right-hand corner running diagonally down to the bottom right-hand corner – look at the diagram on page 41 to see how to mark the rectangle.    Lay onto the (J) ear rectangle at right angles and stitch along the marked line

.....trim and press open .....

Next stitch the (R) background rectangle to the right-hand side of the unit created at step 15 – (not the left-hand side as stated in the pattern).  Follow the diagrams as they are correct.

Stitch the top ear unit to the top of the elephant body at step 17.

Next we make the legs (toes are optional). Follow steps 18 and 19 to create two toe units.  If you are not adding toes you will still need to complete step 18.

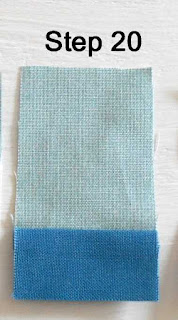
Step 20 will create two leg and feet units each measuring 1½” x 2½”.

And step 21 will join the four units created at steps 18, 19 and 20 together to create the bottom elephant unit.

You are now ready to complete the patchwork Elephant block by stitching the elephant’s legs to the elephant’s body.  

To finish add an eye to the elephant (I marked it in place first and used a simple overstitch using two strands of embroidery cotton).

Phew – there we have it.  One really cute Elephant Block.  
Block 37 - pretty in pink 

I look forward to seeing your blocks over on Instagram (#block 37elephant) or in the Flickr group.   Next week we will be back to a quick and easy applique with block – Night Owl.  
Block 38 - Night Owl

Monday, 5 November 2018

Patchsmith Sampler Block 36 - Moonlit Star

Block 36 - Moonlit Star
Before we start on this week’s Moonlit Star block I just want to remind you that there is a typo in paragraph 9 and R9 of the pattern – it should read “With right sides together place a marked (J) square .....” - the diagrams are correct.

Okay - let’s get on with this gorgeous block. The directions in the book allow you to have the moon facing to the West as shown above or facing to the East as shown below. Either way the steps are the same up until step 9.
Block 36 - East Facing Moonlit Star

To begin with, for either direction, you will need to make three flying geese units and one slightly larger ‘goose’ unit as detailed at steps 1 to 4 of the pattern.
Three regular flying geese and one fatter goose!

Once this is done you can construct the star unit with the moon on the right-hand side.
Follow steps 5 to 8 with the moon on the right-hand-side.

Then if you want a West facing moon just continue with steps 9 to 12 of the pattern. But, if you want an East facing moon, you will need to flip the star unit and follow steps R9 to R12 detailed on page 39.
Flip the star if you want an East facing moon.

East or West you should end up with a lovely 6½” Moonlit Star block (unfinished size) which should light up any project or quilt. Once done pop over to Instagram and share a photo (#block36moonlitstar).  Or post one in the Flickr group.  

Next week we make the hardest block in the book - Block 37 - Elephant. Until then .....