Showing posts with label binding. Show all posts

Wednesday, 4 May 2022

Patchsmith Animal and Pet and other mug rugs books on Etsy and Amazon

Animal and Pet Mug Rugs (PDF) via ETSY
One of my aims when I started as The Patchsmith ten years ago was to price my patterns to be affordable to all.  And my pattern books do just that.   I currently have seven mug rug pattern books which are available in PDF format from my
ETSY store for immediate download and they are also available in paperback format via Amazon. 

Each mug rug pattern book contains ten stand-alone patterns which you can use to create fun and functional mini quilts to gift or to keep.
 
All 10 patterns are included in the Animal and Pet pattern book

But, if you only want one or two patterns from one of my pattern books it is worth checking in my ETSY store to see if I have them listed individually - there are always a few patterns that I sell individually especially for those who only want one or two.

Every book includes details of binding, fabric choice and applique methods so that you have all the information you need in one handy book.

Available in PDF form via ETSY
Also available in paperback format from AMAZON

I am currently working on my eighth mug rug pattern book which I hope to publish in a month or two.  But until then I thought I would show you the contents of some of the books over the next few weeks so you can see exactly what fun you can have with any one of these collections.

So until then ......

Tuesday, 14 December 2021

No Binding Mug Rug

Celebration Candles Mug Rug minus the binding

If you don't like binding small quilts or mug rugs - don't.  There is a simple way to finish your mug rugs without having to bind them.  (However, if you do like the finish that binding gives, check out my free handout on the three most popular binding methods HERE.)

Some people like to bind and some people don't

To skip the binding, make up your mug rug top as per the pattern.  When you are ready to quilt the mug rug, omit the backing material and placing the batting behind the mug rug top.  Quilt as desired.  If you are making a QAYG mug rug, like the Celebrations Candle mug rug, the quilting would have been completed as you stitched the mug rug together.

Nearly finished - just need to applique the flames.

Once the quilting is finished, trim the batting to the same size as your mug rug top.  Place the backing rectangle, RIGHT SIDE FACING UP, on the work table.

Place your backing rectangle right side facing up

Place the quilted mug rug top, RIGHT SIDE FACING DOWN, onto the backing rectangle.  Pin or baste to stop the two layers moving, ensuring you keep both flat and crease free.

Place the quilted mug rug top right side facing down

Stitch around the mug rug top, through all layers, using a 1/4" seam allowance, leaving a 2-3" gap along one side of the mug rug.   TipMake sure to overstitching securely at the beginning and end of your stitching to stop the seam coming undone when turning the mug rug out.

Trim the backing rectangle to the same size as the mug rug top and trim the corners before turning the mug rug right side out.  

The back of the mug rug will hide all your thread ends.

Finally, press and stitch the opening closed.  I find little hand-stitches help the opening remain invisible.

Very small hand stitches close the opening

And there you have it.   A quick and easy way to finish a little quilt or mug rug.

Grey and silver make a sparkling Christmas mug rug.

Wishing you all..........

A VERY HAPPY AND HEALTH CHRISTMAS.

Thursday, 26 August 2021

The Patchsmith's QAYG Log Cabin Coaster Tutorial

A scrapilicious quartet of coasters

I like to use fabric scraps to make something functional and good looking.  So I thought I would share with you how to whip up a quilt-as-you-go log cabin coaster for your desk or coffee table.

Binding scraps have never looked so good!

Instructions are given for a finished coaster measuring 4½” square.  To start you will need to cut:

One 1½” square for the middle;

Eight 1¼” x 5" strips of fabric for the logs;

One 7" square of batting:

One 7" square of backing fabric;

One 1¼” x 20" strip of fabric for the binding.

NOTE:  I prefer to stitch my logs into position and then trim them - it allows me to swap the order around as I go.   However, you may prefer to trim your logs before stitching them, in which case you will need to cut one log 1¼” x 1½”; two logs 1¼” x  2¼”; two logs 1¼” x 3", two logs 1¼” x 3¾” and one log 1¼” x 4½” and ignore all reference to trimming logs in the tutorial.

1.    Firstly, position the 1½” square in the middle of the batting as shown.

Position center square in middle of wadding.

2.    Next position the first log so that it aligns with the top left-hand side of the middle square, right sides together. 

Align first log with left-hand side of center square

3.    Stitch the log to the middle square along the 1½” side.  Finger press the log open.  Note:  Do not press with an iron if using synthetic batting - it will ruin your iron.

Finger press your logs open 

4.    Carefully trim the log so that it matches the length of the middle square, but do not cut through the batting (ignore this step if you have pre-cut your logs to size).

I trim after I have added a log.

5.    Next place the second log, right sides together, along the top of the patched unit aligning the left and top edges as shown.

Keep adding logs in a clockwise direction

6.    Again stitch along the top edge of the patched unit, stopping just before the end of the center square.  Finger press the log open as before.  Trim the length of the log so that it matches the length of the patched unit.  The patched unit should now measure  2¼” square.  (Do not worry if your patchwork doesn't measure exactly this - we will square it up at the end.)

I often change the order of my strips as I stitch

7.  Repeat the stitching, finger pressing and trimming to add the logs in a clockwise direction until all eight logs have been stitched in place.  (If you want a bigger coaster just add a couple of extra logs.)

Ready for trimming

8.    Once all logs have been stitched in place trim your coaster to 4½" square.  I used the lines on my ruler to help with this but if your logs are not straight do not worry - just rename your coaster the Wonky Log Cabin Coaster - it will still look good.

I use a small rotating cutting mat for small projects

9.    Place the backing square wrong side facing up and place the quilted coaster on top with the right side facing up.  Pin or baste together so that they don't move as we bind the coaster.

10.    You can bind the coaster using your favourite binding method.  I used a 1¼” mitred binding method that I use for my mug rugs and here is how I did it. (I have a PDF on binding methods which may be helpful to print and view at the same time as this tutorial.)

11.    At the left-hand side of your binding fold and press the end into a triangle as shown below

This small step will make the binding neat

12.    Position the folded triangle, right-sides together, approximately half way along the top edge of the coaster aligning the raw edges.  Pin in place at the start and place another pin ½" away from the right-hand edge of the coaster.

I use pins to keep my coaster and backing smooth 

13.    Stitch the binding in place using a ¼" seam allowance, stopping when you reach the right-hand pin.  Cut the thread and remove the coaster from your sewing machine.  Trim the backing fabric along the top edge of the binding to the same size as the coaster.

14.    Fold and pin the binding 90 degrees upwards at the right-hand corner of the coaster as shown.  The right-hand point of the folded triangle should meet with the right-hand corner of the coaster.  
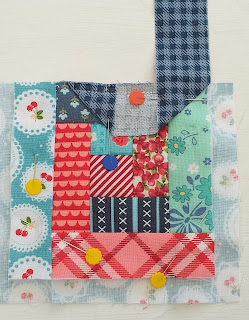
It looks weird but it works!

15.    Now fold the binding down over the folded corner so that the right-hand edge of the binding aligns with the right-hand edge of the coaster.    

The fold in the binding aligns with the top edge of the coaster

16.    
The fold at the top should line up with the top edge of the coaster and the binding strip should lie on top of the coaster right-sides together as shown.

You can't see the triangle fold but it is still there.

17.   Place a pin at the very top to keep the fold securely in place.

Pinning keeps everything in place

18.    Stitch the binding to the right-hand side of the coaster using a ¼" seam allowance.  Cut the threads and remove the coaster from the machine.  Trim the backing to match with the right-hand edge of the coaster.

That is the first mitred corner done.

The top right-hand corner of the binding should now look like the photo below.

Can you see how this is going to work?

19.    Repeat this process to bind the bottom and left-hand edges of the coaster. 

20.    When you get to the final corner, fold and pin the binding at the corner as you did for the previous three corners.

The last corner is just the same as the others.

But this time cut the binding length so that it ends  ½" past the raw edge of the folded triangle.

Cut the end of the binding just passed the triangle fold

21.  Stitch the binding in place from the corner to the end of the binding. 

Phew - all four mitred corners done

22.  Fold the binding away from the middle, towards the back of the coaster.

Now you can see why the fold at the beginning is a good idea.

23.    At the back of the coaster, turn under ¼" along the raw edge of the binding and slip-stitch in place.  I also put a small stitch at each corner to secure the mitred corner.

Look closely and you can see the triangle fold at the beginning.

And there you have it - one log cabin coaster. You can download a PDF showing three different binding methods, including the mitred binding method below. 

COASTER AND MUG RUG BINDING METHODS

Don't forget to tag me on Instagram if you use this tutorial (@thepatchsmith).  

Until next time .....

Monday, 21 January 2013

Quick Fuse Applique

Night Owls Mug Rug
This week I thought I might cover some hints and tips for quick fuse applique.
(Note:  To see the stitching close up on any of the mug rugs pictured just click on the mug rug - this will take you through to my Etsy shop where you can scroll over the picture to bring it more into focus.)

What is quick fuse applique?   It is a method of fusing fabric to fabric using a fusible webbing.  You may know fusible webbing as ‘bondaweb’, ‘wonder under’, ‘steam-a-seam’, ‘Vilene Vleisofix’ - it is all generally the same format - paper with double sided fusible webbing attached.  It allows you to fix shapes of fabric onto a background as shown in the Bunny Hop mug rug below.
Bunny Hop Mug Rug

How is it used?  One side of the fusible webbing is paper and the other side is an adhesive webbing.  You trace a design onto the paper side, cut it out roughly then fuse it onto the WRONG SIDE of your chosen fabric according to the manufacturer’s instructions (normally with a warm iron).  This will fuse the webbing to the fabric.  You then cut out the shape accurately, peel off the tracing paper and position the shape onto the RIGHT SIDE of your mug rug before fusing it in place.  Details of how to applique via this method are included with every Patchsmith pattern.

Storage of fusible webbing.   Some people like to cut sheets of fusible webbing (10"-12” square is a good size) and store the fusible webbing flat, in a bag.  Others like to store it on a roll which is how I store mine.  Whatever you do you should try not to fold it as this may make the webbing separate from the paper.  Whichever method you use it is also a good idea to pop a little silicone sachet (the type that come in handbags or shoes) into the drawer or bag in which it is stored because any moisture in the air can make the webbing separate.

Positioning applique shapes.  Take your time when positioning your applique shapes onto your mug rug prior to fusing.  I always have the applique sheet on the ironing board as I fuse the pieces onto the mug rug - this is how I constructed the Hive on the Side mug rug.
Fun Mug Rug Patterns
If you do make a mistake it is sometimes possible to gently pull the webbing shape off and reapply it but this will depend very much of the fabric used.  You will only be able to do this once though as the webbing will lose its adhesiveness.  Also when laying your shapes out on the mug rug remember to take into account the ¼” border and ensure all shapes are at least ¼” from all edges of the mug rug (unless the pattern states otherwise).    For example, with the Early Bird mug rug below - if you apply the little birds (optional) you will want to position them closer to the tree to allow for the ¼” border on the right-hand side.  
Early Bird Mug Rug pattern

Stitching the applique shapes in place.   With quick fuse applique the fabric is fused in place so the purpose of your stitching should be to secure the fabric to enable it to be laundered without separating.  You can stitch by hand or machine – both give differing looks to the shapes as mentioned previously HERE  The choice is totally up to you.  I use both methods – sometimes in the same mug rug as in Moonlit Cat mug rug shown below (the fish bones were hand stitched whilst the cat and moon were machine stitched).  I find machine stitching subtle but I also like the rustic look of hand stitching. 
Moonlit Cat Mug Rug
When hand stitching the most common stitch used is the blanket stitch but you could also use a straight stitch, cross stitch or a simple running stitch.  The main thing is that you stitch close to the edge to stop the fabric fraying and to hold it in place.  You should be aware however, of the impact the stitching will have on your mug rug.

Tip:  When stitching small pieces or felt pieces use only one strand of cotton rather than the usual two strands.  This will minimise the impact of the stitching.  In Black and White Cats I did not want the stitching on the mouse or the fish to stand out too much so only one strand was used. 


The size of stitch you use will also impact the overall look.  A small stitch appears neat and modern whilst a larger stitch can appear rustic and country.  In all honesty you most probably have a natural stitch length which will become evident once you start appliqueing. 
Valentine hearts mug rug pattern

Finally the colour of the thread you use can be influential.  Nowhere is this more evident than in Valentine Hearts where the gingham heart has contrasting stitching whilst the stitching blends in perfectly on the solid red heart.  Many embroidery cottons come in a matt or sheen look and you will have to decide if you want your stitching to co-ordinate and blend or contrast and become a stitching feature.  Both have their appeal.   On the Christmas Delivery mug rug below I have co-ordinated the thread with the robin redbreast but contrasted the thread on the envelope.  This has given definition to the envelope whilst the robin needs no such enhancement.
Christmas Delivery Mug Rug

Tip:  If you do not have access to embroidery cotton you can get away with using two strands of sewing cotton.  This will secure the applique in place and in many cases you will not be able to tell the difference.

This all sounds like a lot of decision making but once you start stitching you will find you make these choices naturally and you will discover your quick fuse applique style.  Remember that sewing, quilting and embroidery should be fun, productive and satisfying so do not worry if your stitching isn’t always even or the cotton doesn't blend perfectly.  Do the best you can, learn along the way and have as much fun as possible. 

That's it for this week’s hints and tips.  Next week I will cover the etiquette of participating in a mug rug swap. 

Sew until next time ......