Pages

Monday, 28 May 2012

Zakka Style Messenger Bag

Oh my, oh my, oh my.  I can't stop smiling.  I am so pleased with myself - I made a bag.  Okay, some of you may be seasoned bag-makers but I have never made a bag before and when I read Sew Sweetness today she said this bag is a "great sew for a confident beginner or an intermediate seamstress".  I was in two minds about undertaking this challenge anyway but this made me think that I could do it as I class myself as a 'confident beginner'.  So I set out this morning, Zakka Monday at about 9.00 a.m. cutting out.  By tea-time it was finished - and I had been out to the shops, cut the grass and posted a mug-rug to a waiting recipient in America - so I haven't spent all day on it. 

The instructions are crystal clear (but check here for the one amendment). I ticked them off in pencil as I completed each one.   But I do have some tips.

First tip:  do not buy new hardware for this bag - pop into your nearest charity shop and I will 'bet-my-bottom-dollar' that you can find an old bag with the necessary tri-bar slider and rectangle loop.  This is exactly what I did; the first charity shop had a bag with, what looked like, the right size equipment.  I handed over my 99p and rushed home.  Yes, it was the right size and there were two tri-bars on the bag along with the rectangle loop.  I even managed to salvage the brown mesh handle for another project later on maybe! 
Second tip: if you use a stiffer interfacing make sure you have spare needles.  Bluepatch Quilter had made the bag before jetting off on her hols and said she wished she had made it a bit stiffer.  So I took her advice and used a heavier fusible interfacing.  Three needles later and the strap was done!  But she was right, the strap, the flap and the bag are better for it.
Third tip:  don't get a saggy bottom.  No, I'm not talking about your derriere but the bag's bottom.  Again Bluepatch Quilter mentioned she wanted a firmer bottom so I covered a piece of card with lining fabric and hey presto - a firm base.  As for quilters getting a saggy bottom - it goes without saying as we spend so much time on it!

Fourth tip:  leave AT LEAST six inches to turn the bag through - think Zakka pencil case and you will know what I mean.
Now there was a moment, when I was turning the bag through that I did wonder what I would be left with.  But I squealed with delight when all was where it should be and I had a working messenger bag.  The bit I'm most pleased with (aside from the colours) is the strap - for somebody who is not very dexterous when it comes to things looping through and being able to pull extensions etc, etc. the instructions were perfectly clear.  Just follow them and you too will end up with a stunning bag.

As I walked in to show my daughter she was shocked.  "How much of that did you make and how much did you buy?" she asked (she had seen me come home from the charity shop with the old bag).  "I made all of it," answered I, "even the firm bottom!" 

So I've gone from an old bag to a stylish messenger - all in the space of one Zakka Monday.

Monday, 21 May 2012

Mini Block Quilt - Zakka Week 8


Week 8 in the Zakka Style sew along is a wonderfully, simple block quilt designed by Leslie Good.   It is another design in the Zakka Style book of projects (compiled by Rashida Coleman-Hale) that oozes Japanese elegance.  Just one teensy, weensy problem from my perspective - it is lap quilt size and I really don't need another lap quilt!  You see, I have just finished one - I was given a new sewing machine for Christmas and I made a lap quilt as a way of getting used to the machine.  So, what to do this Zakka Monday?  I want to make every item in this wonderful little book but I also want them to be useful and practical.  There is only one thing for it - I will make the item fit my needs. 

After last weeks mug rug - which was my first ever mug rug I might add - I decided to resize the lap quilt to make a placemat (alternatively it could be used as a doll's quilt).   This was relatively easy due to the simple block design.  I reduced the original pattern down from 45" x 61" to 8" x 11".  Click here for cutting and size measurements if you fancy having a go.  It is a great way to use that ever growing supply of scraps.

As you can see from the picture, not all my squares ended up evenly sized but I still love the look.  I am also still practising my freestyle machine quilting - will I ever get the hang of it??  But this little beauty is on my small table at present with the fruit basket placed on top.  Perfect. 

Michelle from I Like Orange has made the full size quilt in a wonderful denim look fabric with vibrant prints.   It is stunning.  She has also provided lots of links for newbie quilters - and I must agree with her - this is a perfect first quilt project. 

Aside from Zakka Monday, I have been working on a journal protector for a friend at work.  The front of her journal is decorated with jewels and gems and she keeps the journal in her bag wrapped in a tea-towel for protection.  Well I thought I could come up with something a little bit better so I made a simple square with velcro tabs which folds over her journal.

It is reversible; one side is a lovely Parisian print and the other a green check.  She particularly wanted something that is easy to open and close as she often writes little sayings or thoughts down in it.  I hope this does the job otherwise it is back to the tea towel!!

I am also designing a mug rug to swap with another Zakkarist from the United States.  I am using colours and fabrics that I don't normally use whilst at the same time trying to make it unique.  I love the designing aspect and putting patterns and colours together and this mug rug swap is just so much fun.  I can see this getting addictive just like those little Zakka magnets!!  So much fabric and so little time - choices, choices, choices!!

Monday, 14 May 2012

Zakka Cloud Mug Rug - Week 7

What a lovely weekend.  Not a cloud in the sky – except here in Zakkaland where there is just one cloud on a linen blue sky.  Yes that’s right, this week’s Zakka project is the cloud mug rug.  

I don’t know whether it is a regional thing but we don’t tend to have ‘mug rugs’ in England – well I have never come across one!  My house is strewn with fabric coasters though which I change regularly to reflect the seasons and, until this project, I thought a mug rug was another name for a coaster.  Now I realise the difference.  This is the first mug rug I have made - and I like it; it is an excellent size for my coffee cup and a biscuit.  I looked on Flickr for other mug rugs and it appears that people create them and then swap them with other like-minded stitchers.  What an excellent idea - I think I might join in next time there is a ‘mug rug swap’.  My mind is whirring already with ideas and I was particularly inspired by the Patchwork Pottery’s designs.

As soon as I saw the Cloud Mug Rug in 'Zakka Style' I was drawn to the unfussiness and simplicity of the design.  It is very Zakka.  However, this presented me with a dilemma.  Whilst I love the elegant and clean design I knew that if I made the cloud mug rug in sky blue linen then it would spend more time in the laundry than on my table.  So I reworked it slightly by keeping the design but adding a half rainbow background.  That way I can place my coffee cup on the rainbow half without too much concern about leaving an obvious coffee stain.   Having said that I think the sky blue linen option looks more elegant.

I had a little trouble appliquéing the cloud as per the instructions.  I tried twice to hand turn ¼” under and slip stitch it in place as per the book but each time the cloud would lose its definition.  In the end I gave up and blanket-stitched it instead.  I then machine quilted the wind lines on – I am pleased with the result but realise I need a lot more practise at freehand machine quilting.  I have stipple quilted by machine before but I have never attempted to follow a line or a design.  This is something I am going to learn how to do and I have ordered a book to help me.
When it came to binding the mug rug I noticed that the photograph showed the mug rug corners were mitred yet the binding instructions in the book didn’t tell me how to do this.  I normally use the method whereby you cut four binding strips, attach them first to the two sides, press away from the quilt and then attach binding strips to each side before folding towards the back and hand stitching in place (as shown on the left-hand coaster above).  However, the mitred corners look more professional (right-hand coaster above).  I know I have used this method in the past but I just couldn’t remember how to do it.  So I researched it and found out.  It is quite easy once you know how and I do prefer the finished look.  I have created a page which details the method for anybody else who is interested.  Click here or on the page link to the right.
In order to practice my binding technique I made two nine-patch blocks and two brick blocks from the Zakka magnet project last week.  In place of the itty bitty blocks for the magnets I increased the size of the nine-patch squares to 1” each (1½” cut).  This gave a nice size coaster for the bedside table (3½” when binded).  For the brick block I wanted a slightly larger coaster (4½” when binded).   Now you’ll understand why I have so many coasters around the home - I use them to practise my skills.  My daughter nabbed the two brick block coasters for her room but here is the pattern for you if you fancy making one or two for yourself or click on the page link to the right.

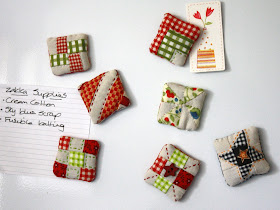
As for those pesky little magnets from last week – how addictive are they?  Friends admire them and before I know it, they are walking out the door with one.  So although I mumbled something about ‘never again’ I just couldn't help myself and I've made some more.  I used the quick piece nine-patch block method and I devised a quicker piecing for the brick block similar to the coasters only much, much smaller.    Last week I thought they were a lot of work for what they are but now I realise – they are little blocks of art that brighten up the home.  And making them is so, so addictive.   In fact, I’ve gotta go and whip up a couple more for my sister.  Enjoy your Zakka project and I’ll be back!

Monday, 7 May 2012

Zakka Monday - Magnets - Week 6

I woke this morning, realised it was Monday and the first thing I thought was Zakka, so from this day forward, until the end of September, I have renamed Monday as Zakka Monday.  But oh my goodness - when I set out on the itsy bitsy magnet journey I did not imagine they would take so long.

There are six designs of magnet and it never occurred to me not to make them all - after all they are so little - how long would it take?  It took hours ... and hours .... and hours.  I have rated the six magnets dependent upon skill required to patch them as follows:
EASY -  Brick Cross and Offset Log Cabin
INTERMEDIATE - Nine Patch and Pinwheel
TRICKY/FIDDLY - Friendship Star and String

ALL of them are fiddly to finish off.  I also found it impossible to find magnetic sheet in Southern England so I purchased self-adhesive magnetic card used to create magnetic business cards - this was available from the main (or should I say 'only') craft supplier in the region.  I cut one card into six pieces and stuck a square to the back of the finished magnet.  It is really strong and will not budge. 

I really enjoyed patching these little magnets and found a simpler way of constructing the Nine Patch.  My favourite is the friendship star.  In a Zen moment of madness I have decided that I will actually give this one away (Zen/Buddhism states we should give away that which we hold most dear).  I will just enjoy it for a few days first though!

So my recommendation is to make just two to begin with.  As an added bonus, if you follow my simple construction of the Nine-Patch you automatically make two magnets in the time it takes you to make one - so this is a good choice to start with.  Click here for the quicker construction of the Nine-Patch magnet block.

Friday, 4 May 2012

Gifts for others

I have completed the two Zakka sewing kits that I made for gifts.  The left-hand kit is for my sister and the right-hand kit is for a friend. 


The Zakka Sew Along uses linen in all their makes.  I have to say I think I prefer cotton.  I am used to patchwork and quilting and I find I cannot get the crispness with linen that I can with cotton.   Having said that some people have used linen and their items look crisp and are good enough to sell (check out Eamylove blog and her Etsy shop).  I just cannot seem to get that look.  As we go along (we are only on week 5 out of 24) I will try all cotton and see how it works out.

As for my gifts, I made a mistake with my sister's kit - can you spot it?  Yes, the toggle button is on the front.  This is because, when I stitched it all together, I had fixed the elasticated loop to the wrong edge.  I know my sister though and she wont mind at all.  Things I've learnt about this project - leave the opening for the turn-through along the middle top edge of lining and not on the edge of one of the side pockets as detailed in the pattern.  It is easier to get a neat hand stitched edge that way. 

This Monday the Zakka SAL focuses on mini quilt magnets so I'm off to find some magnetic sheet so I am ready.  Until then .....